Section 4: Stroke Theory
4.1 The Technical Foundation of Stroke Work
Stroke theory governs the execution of individual marks within the mapped brow structure. While mapping establishes where work will occur, stroke theory determineshow that work appears.
This section addresses four primary domains:
- Direction — the angle and trajectory of strokes
- Density — the quantity and spacing of strokes
- Pressure — the force and weight applied during execution
- Layering — the sequence and overlap of stroke work
Mastery of stroke theory requires both intellectual understanding and physical practice. The concepts are straightforward; the execution demands thousands of repetitions.
4.2 Directional Theory
The Flow Foundation
Every stroke within a brow serves the larger directional flow established by the style family. Individual strokes are not autonomous; they are components of a unified field. The trained artist sees each stroke in context, placing it to support and extend the established flow.
Directional Parameters by Zone
Zone Directional Parameters
Purpose: Visualise directional angles across brow zones
Directional flow parameters showing angle relationships across the head, body, and tail zones. Use as a reference when assessing stroke direction by zone.
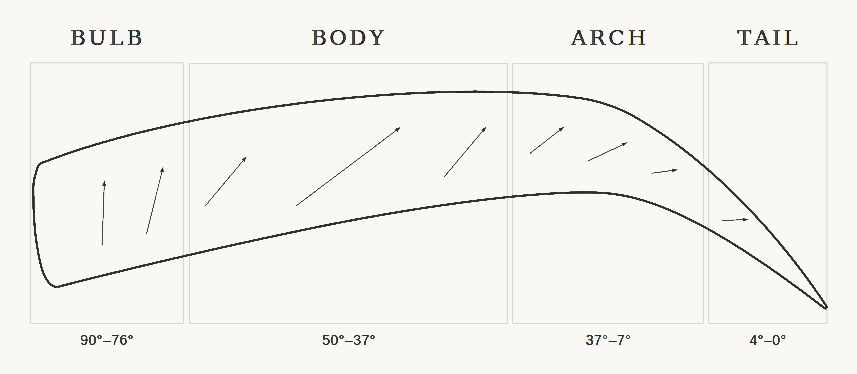
Zone 1 (Bulb) Directional Rules
The bulb establishes the initial directional character. It sets the tone for the entire brow.
Classic Flow:
- Strokes angle gently upward from the medial origin
- Angle range: 75–85° from horizontal (near-vertical with slight outward bias)
- Strokes maintain parallel relationship
Soft Harmony Flow:
- Strokes radiate softly from the lower medial region
- Fan angle range: 60–85° from horizontal (widening fan)
- Radiation is gentle; unification begins before Zone 1 ends
Expressive Flow:
- Strokes radiate sharply from the medial origin
- Fan angle range: 45–85° from horizontal (pronounced fan)
- Radiation is intentional and dramatic
Elevated Flow:
- Upper strokes angle slightly downward from superior boundary
- Lower strokes angle slightly upward from inferior boundary
- Convergence angle: 80–85° (subtle convergence beginning)
Modern Edge Flow:
- Upper strokes angle more decisively downward
- Lower strokes angle more decisively upward
- Convergence angle: 75–85° (pronounced early convergence)
Zone 2 (Body) Directional Rules
The body carries the primary directional flow. It represents the greatest stroke concentration and the most visible directional expression.
Classic Flow:
- Strokes maintain parallel alignment throughout
- Angle range: 25–35° from horizontal (following natural growth)
- No convergence; rhythm is paramount
Soft Harmony Flow:
- Radiating strokes unify into near-parallel alignment
- Angle range: 25–40° from horizontal (calming into parallel)
- Transition is smooth and gradual
Expressive Flow:
- Radiating strokes unify rapidly
- Angle range: 20–40° from horizontal (dynamic unification)
- High-energy alignment with visible tension
Elevated Flow:
- Convergence continues through the body
- Upper strokes: 25–35° from horizontal, angling down toward axis
- Lower strokes: 25–35° from horizontal, angling up toward axis
- Convergence creates lift illusion
Modern Edge Flow:
- Sharp convergence dominates
- Upper strokes: 20–35° from horizontal, decisive downward angle
- Lower strokes: 20–35° from horizontal, decisive upward angle
- Maximum structural tension
Zone 3 (Tail) Directional Rules
The tail resolves the directional flow and completes the brow architecture.
Classic Flow:
- Strokes continue parallel trajectory
- Angle range: 15–25° from horizontal (following taper)
- Progressive refinement to terminus
Soft Harmony Flow:
- Strokes become whisper-light, maintaining near-parallel flow
- Angle range: 15–30° from horizontal
- Soft fade to terminus
Expressive Flow:
- Strokes release with energy and definition
- Angle range: 15–30° from horizontal
- Powerful, intentional completion
Elevated Flow:
- Convergence tightens through the tail
- Angle range: 15–30° from horizontal with continued convergence
- Lifted terminus appearance
Modern Edge Flow:
- Maximum convergence at terminus
- Angle range: 10–25° from horizontal with sharp convergence
- Controlled re-opening at the very end (1–2 strokes with slightly widened angle)
4.3 Density Theory
Density as Expression
Density is not simply "how many strokes"; it is a deliberate tool of expression. Proper density management creates naturalism, prevents patchiness, and ensures consistent visual weight.
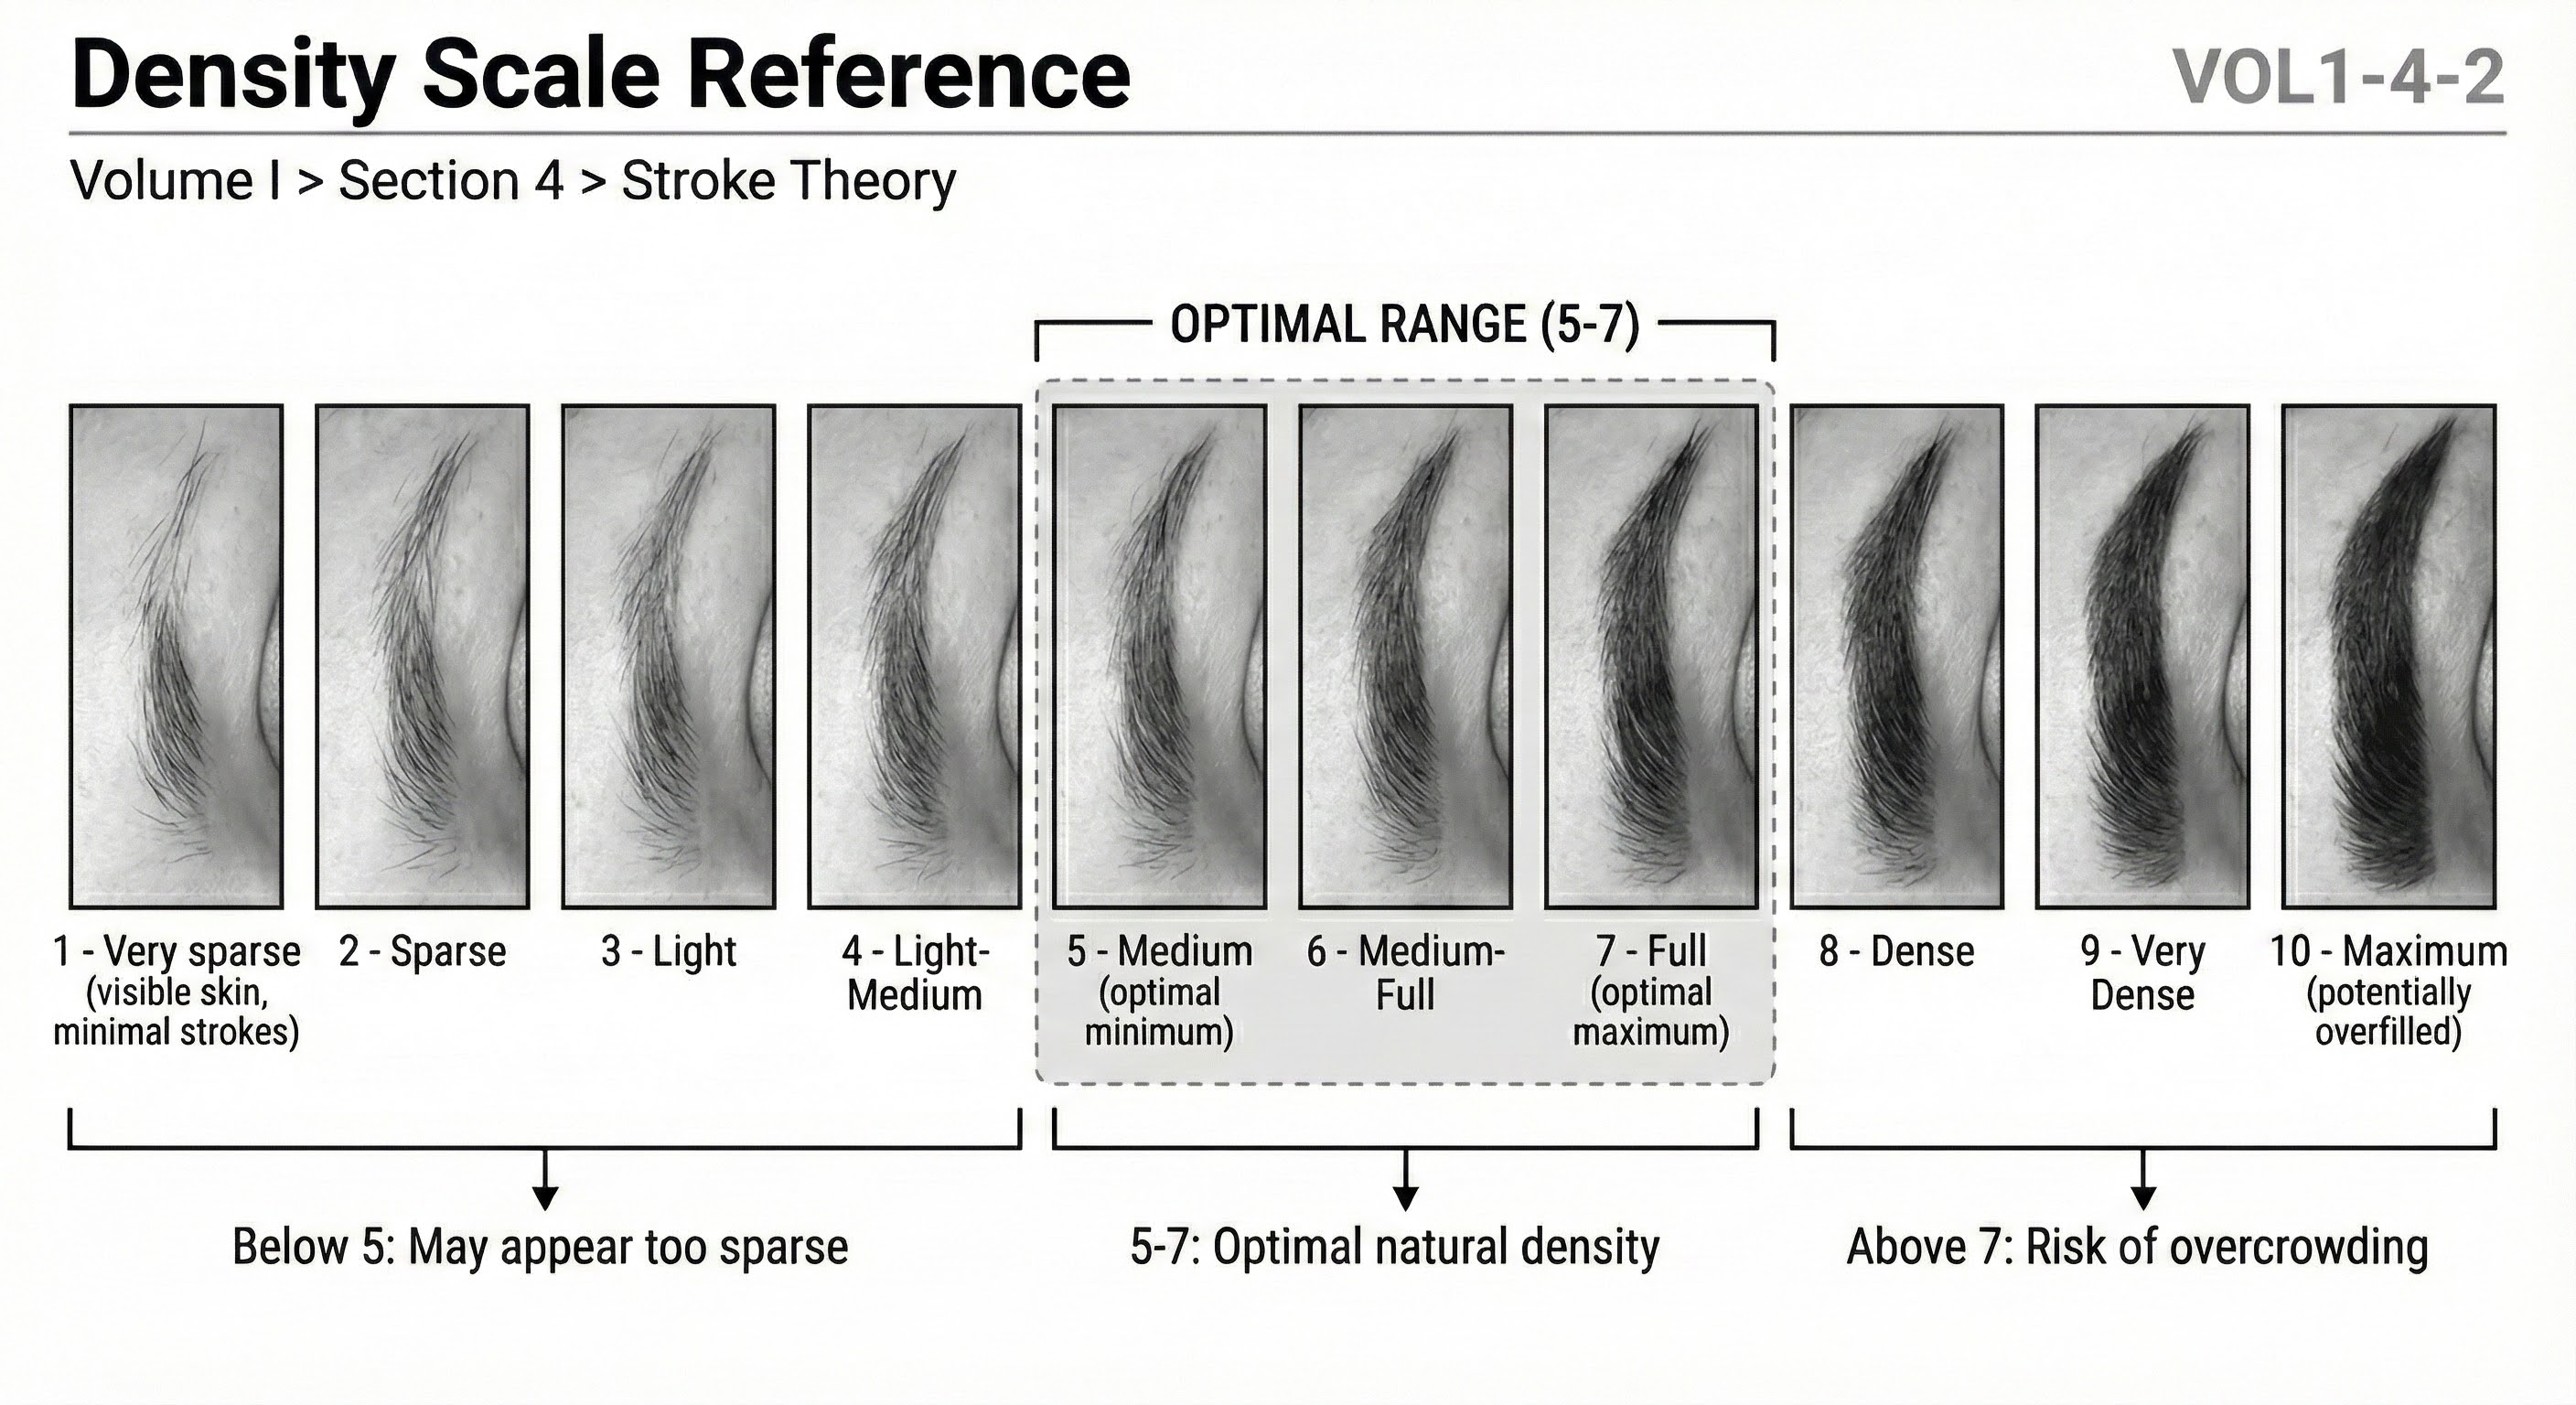
Density Ranges by Style Family
The following density guidelines use a relative scale where 1 = minimum visible density and 10 = maximum density before solid fill.
Density Scale Reference
Purpose: Visual scale showing density levels with stroke spacing
A visual scale showing density levels 1-10 with corresponding stroke spacing, from sparse to near-solid.
| Family | Zone 1 Density | Zone 2 Density | Zone 3 Density |
|---|---|---|---|
| Classic | 3–4 | 5–6 | 4–5 |
| Soft Harmony | 2–3 | 3–4 | 2–3 |
| Expressive | 4–5 | 6–7 | 5–6 |
| Elevated | 3–4 | 5–6 | 4–5 |
| Modern Edge | 4–5 | 6–7 | 5–6 |
Density Transition Rules
Progressive Change Principle: Density must never jump abruptly between zones. Transitions should span 5–8 strokes, gradually increasing or decreasing to create seamless flow.
No Gaps Rule: Visible skin gaps larger than the width of two strokes indicate insufficient density. Gaps break the visual rhythm and create a patchy appearance. This is prohibited in finished work.
No Saturation Rule: When adjacent strokes merge into a solid mass, density is excessive. Individual strokes must remain distinguishable (under standard viewing distance). Saturation destroys naturalism.
Density Adjustment Factors
Existing Hair Density: If natural brow hair is dense, stroke density can be reduced, as existing hair carries visual weight. If natural hair is sparse, stroke density must compensate.
Skin Type: Oilier skin may cause strokes to spread; reduce initial density. Drier skin holds strokes precisely; standard density applies.
Colour Selection: Darker pigments carry more visual weight; reduce density slightly. Lighter pigments may require increased density for visibility.
Client Age: Mature clients often benefit from slightly reduced density to maintain naturalism. Dense work on mature skin can appear heavy.
4.4 Pressure Theory
The Pressure-Quality Relationship
Stroke quality is directly determined by pressure control. Proper pressure produces crisp, hair-like marks. Improper pressure produces blotchy, blurred, or scarred work.
The Pressure Gradient Model
Each stroke should follow a pressure gradient:
Pressure Gradient Execution
Purpose: Show pressure variation through stroke phases
Cross-section showing pressure variation through entry (15%), body (70%), and exit (15%) phases, producing tapered hair-like strokes.
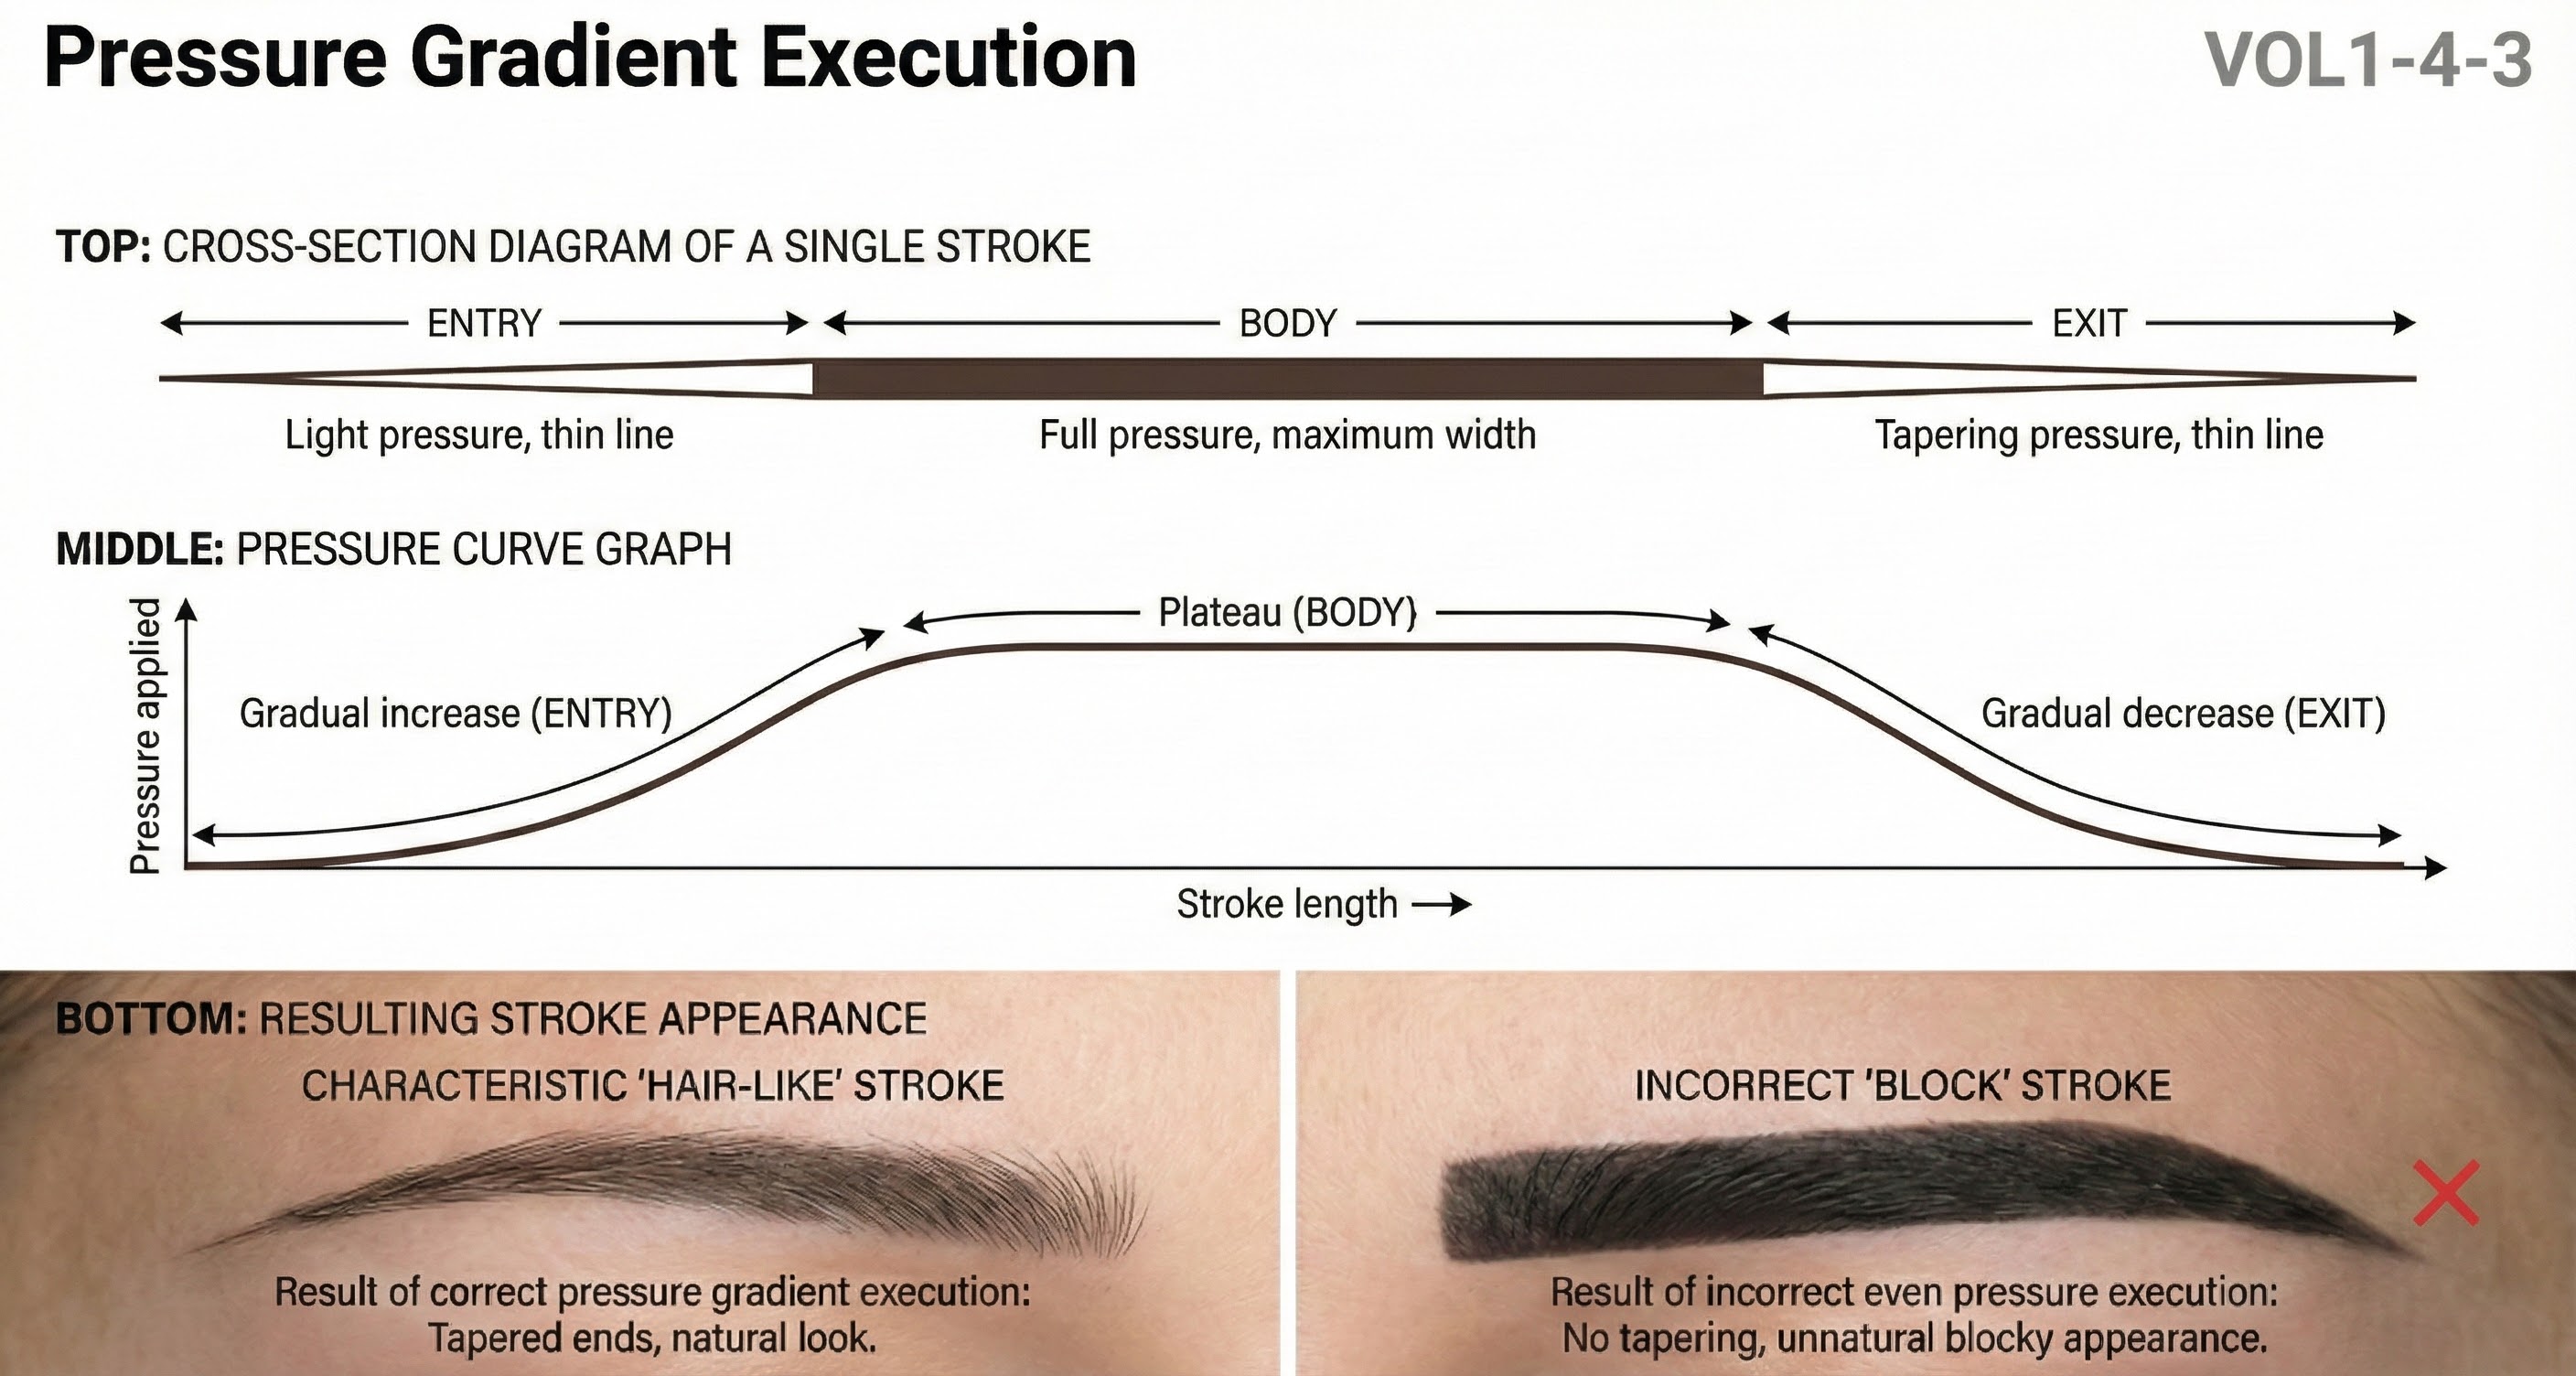
Entry Phase (first 15% of stroke): Light pressure, needle barely engaging skin. Creates a fine, tapered beginning that mimics natural hair root.
Body Phase (middle 70% of stroke): Moderate, consistent pressure. Creates the visible weight of the stroke.
Exit Phase (final 15% of stroke): Reducing pressure, lifting smoothly. Creates a fine, tapered ending that mimics natural hair tip.
This gradient produces the characteristic hair-like stroke: fine at both ends, fuller in the centre.
Pressure Parameters
Light Pressure: Needle penetrates to papillary dermis only. Produces fine, delicate strokes. Risk: strokes may fade more quickly.
Moderate Pressure: Needle penetrates to upper reticular dermis. Produces standard stroke weight with good retention. This is the default for body phase.
Heavy Pressure: Prohibited for standard stroke work. Causes trauma, scarring, and pigment blowout. Heavy pressure may only be used in specific corrective contexts under advanced protocols not covered in this guide.
Pressure Adjustments by Skin Type
Thin/Delicate Skin: Reduce all pressure by 15–20%. Entry and exit phases should be especially light.
Standard Skin: Use default pressure gradient as described.
Thick/Resilient Skin: Increase body phase pressure by 10–15%. Entry and exit remain light.
Mature Skin: Reduce all pressure by 10–15%. Mature skin is less resilient and more prone to trauma.
4.5 Layering Theory
The Logic of Layers
Complex brow work is not completed in a single pass. Layering builds density, depth, and dimension through multiple sequential applications. Each layer serves a specific purpose.
Standard Layering Protocol
Layering Protocol
Purpose: Sequential layer build-up with rest periods
Sequential diagram showing three-layer build-up: Layer 1 (60% density), Layer 2 (80% density), Layer 3 (100% density) with 5-minute rest periods between layers.
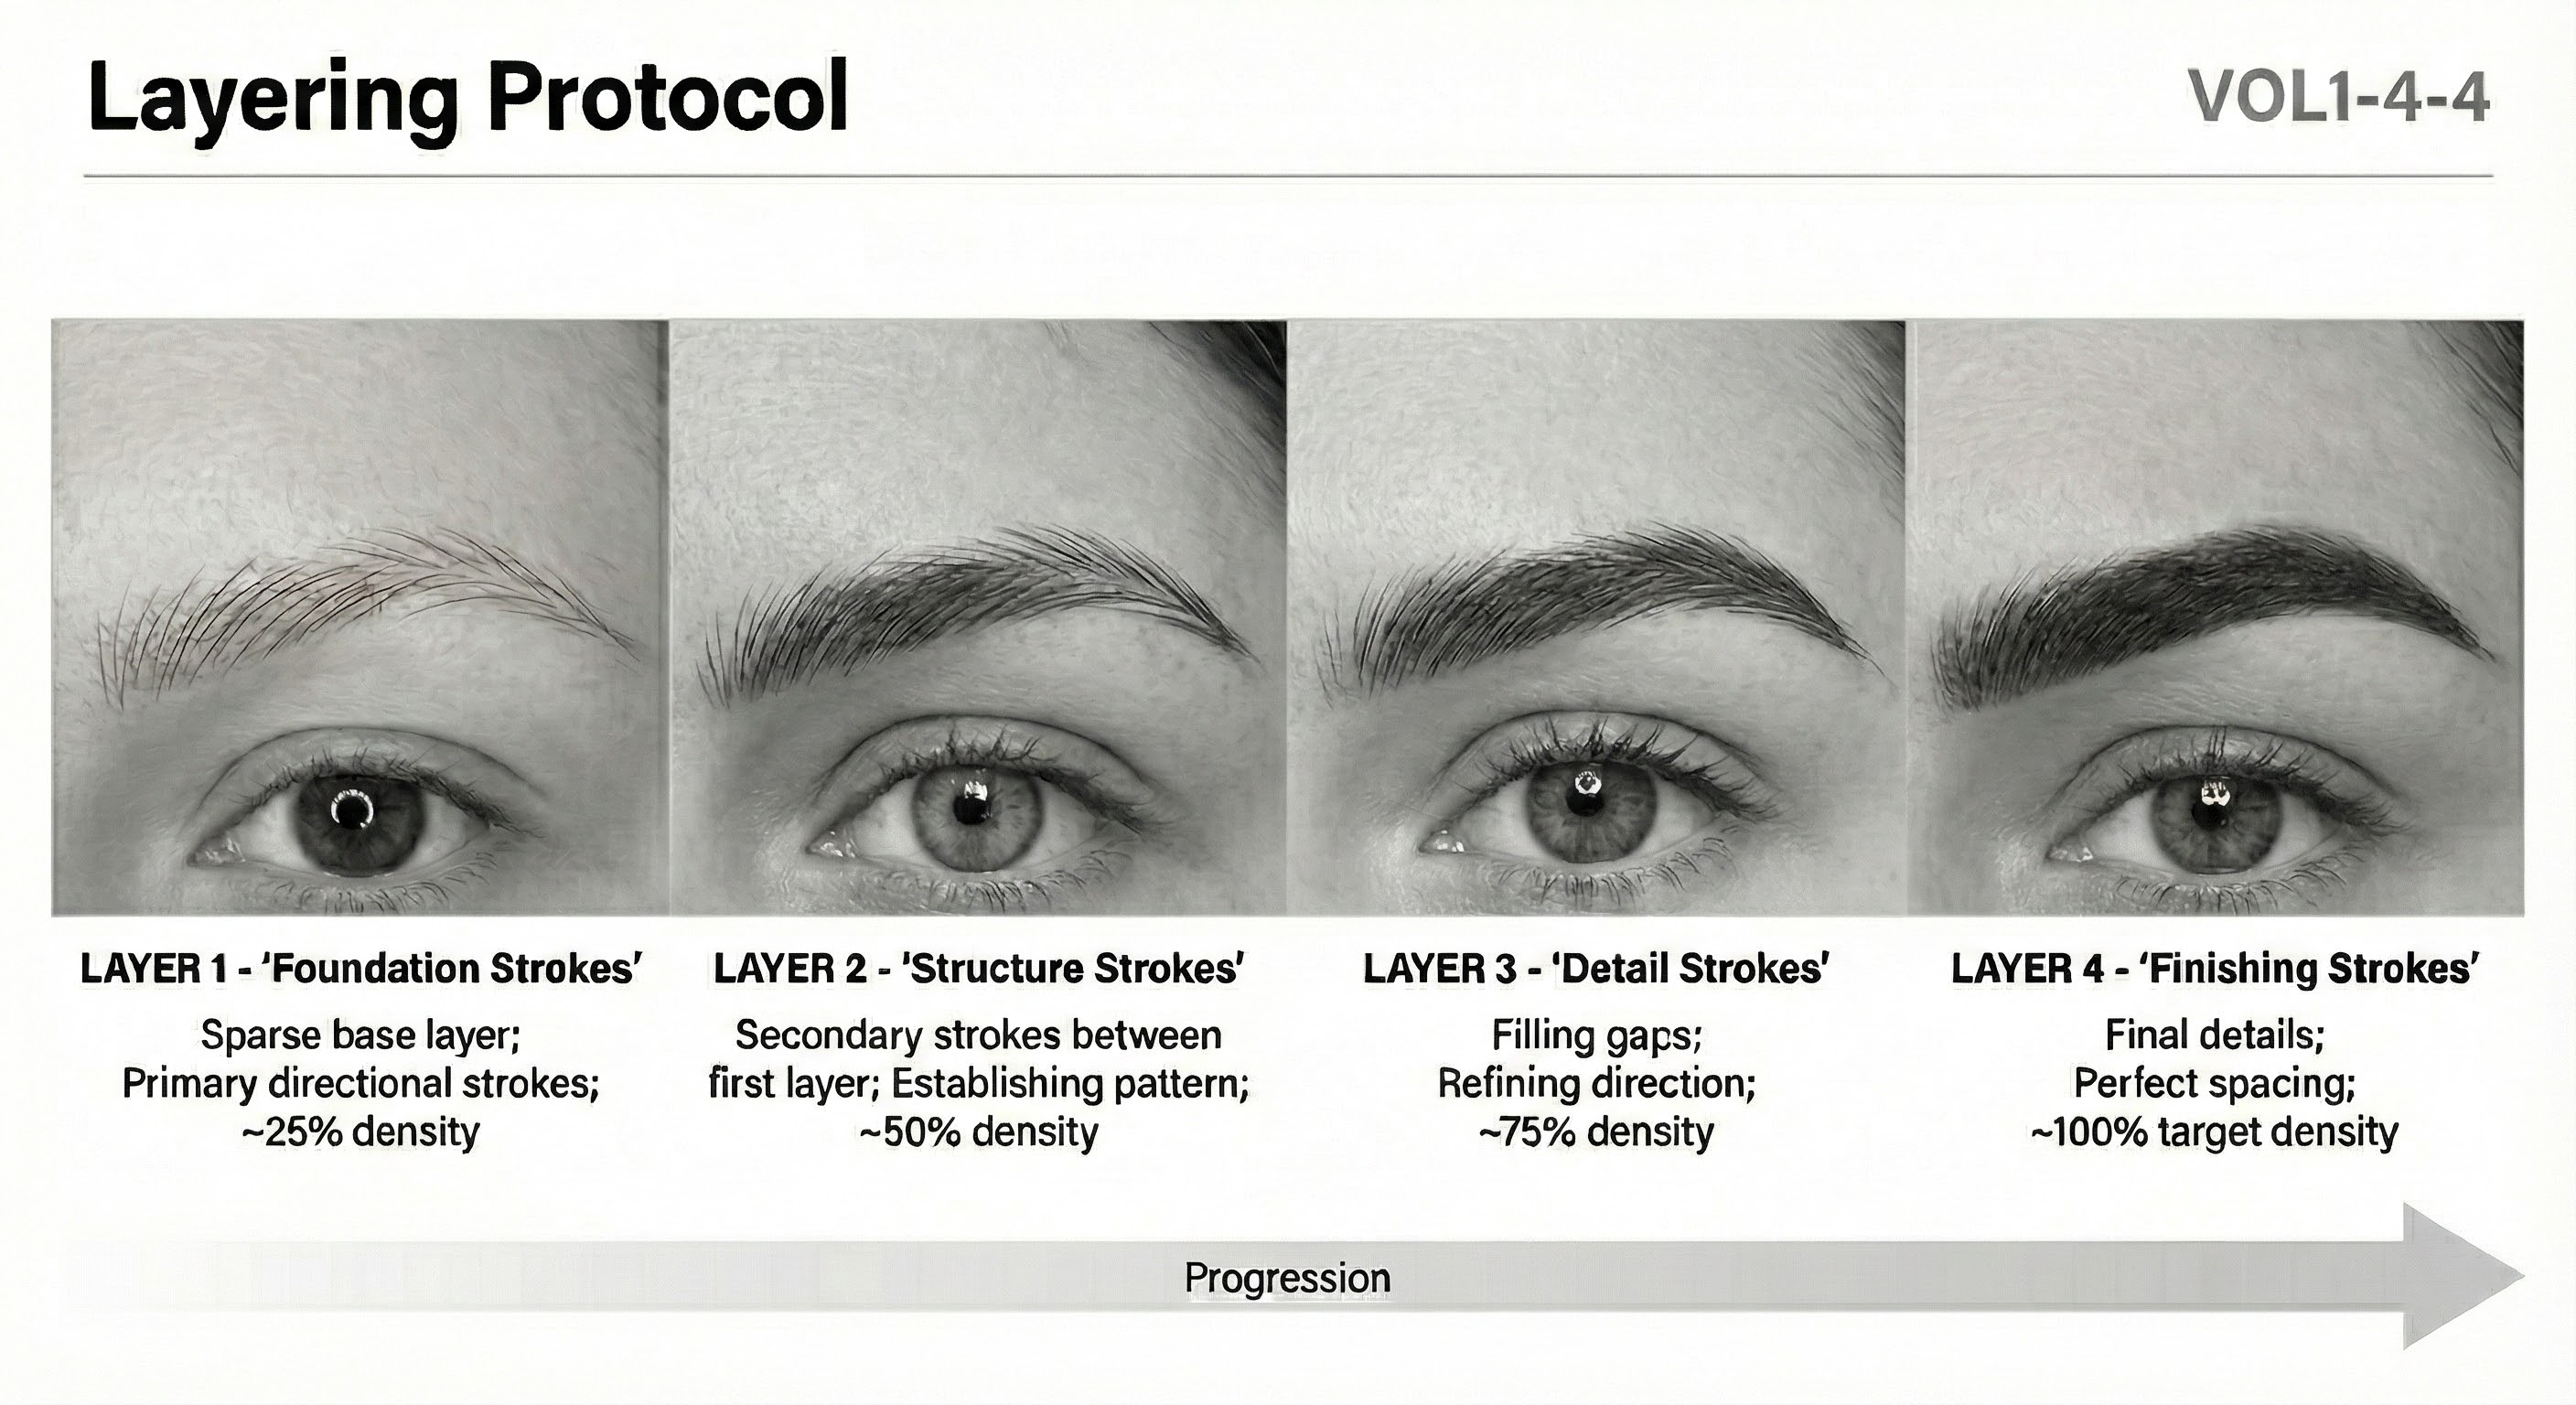
Layer 1 — Structural Foundation: Establishes the primary directional framework. Strokes are placed at full intended length and angle but at reduced density (approximately 60% of final). This layer creates the architectural skeleton.
Layer 2 — Density Build: Adds strokes between Layer 1 strokes to approach final density. These strokes follow the same directional rules but fill the visual gaps. Approximately 80% of final density is achieved.
Layer 3 — Detail and Refinement: Adds final strokes for full density and refines any inconsistencies. Addresses minor directional corrections, fills micro-gaps, and ensures smooth zone transitions.
Optional Layer 4 — Texture Enhancement: For styles requiring additional dimension (Expressive, Modern Edge), a fourth layer may add subtle variations (slightly shorter strokes, minimal angle variations) to create visual texture.
Layer Timing
Each layer must be allowed to settle before subsequent layers are applied.Minimum rest period between layers: 5 minutes. This allows the skin to stabilise and prevents over-saturation.
Working wet-on-wet (applying layers without rest) causes pigment bleeding, stroke merger, and compromised retention.
Layer Direction Protocol
Layers are not applied in the same sequence across zones. The following protocol ensures even coverage without over-working any single area:
- Layer 1: Zone 1 → Zone 2 → Zone 3
- Layer 2: Zone 3 → Zone 2 → Zone 1
- Layer 3: Zone 2 → Zone 1 → Zone 3
This alternating pattern distributes working time across zones, allowing each area adequate rest.
4.6 Stroke Length Guidelines
Length as Communication
Stroke length communicates texture and naturalism. Strokes that are too uniform appear artificial; strokes with appropriate variation appear organic.
Length Parameters by Zone
Zone 1 (Bulb):
- Standard length: 8–12mm
- Variation range: ±2mm
- Shorter strokes create softer texture; longer strokes create bolder texture
Zone 2 (Body):
- Standard length: 10–14mm
- Variation range: ±2mm
- Maintain relative consistency for rhythm; avoid dramatic length changes
Zone 3 (Tail):
- Standard length: 6–10mm (progressively shortening toward terminus)
- Variation range: ±2mm
- Final strokes at terminus may be as short as 4–5mm
Length Consistency Rule
Within any cluster of 5–7 adjacent strokes, length variation should not exceed 3mm. Greater variation creates visual chaos; lesser variation appears mechanical.
4.7 Colour Theory Fundamentals
While comprehensive colour theory extends beyond this guide's scope, stroke work intersects with colour selection in critical ways.
Colour-Density Interaction
Dark Pigments (Level 3–5): Carry significant visual weight. Reduce stroke density by 10–15% compared to standard recommendations. Dark strokes that are too dense appear heavy and unnatural.
Medium Pigments (Level 5–7): Standard density recommendations apply. These represent the baseline for most clients.
Light Pigments (Level 7–9): Carry less visual weight. Increase stroke density by 10–15% to ensure visibility. Light strokes at standard density may appear sparse.
Colour-Pressure Interaction
Lighter pigments may require slightly increased pressure (5–10%) to achieve comparable retention. Darker pigments retain well at standard pressure.
4.8 Stroke Execution Checklist
Before executing each stroke, the VELONÉ artist mentally confirms:
- Direction Correct? Does this stroke serve the family flow?
- Position Correct? Is this stroke placed to support density goals?
- Length Appropriate? Does this stroke fall within zone parameters?
- Pressure Ready? Am I prepared for the entry-body-exit gradient?
- Layer Sequence? Does this stroke belong in the current layer?
This checklist becomes automatic with practice. Until it is instinctive, conscious verification prevents error.