Section App. 10: Microblading Theory (Master-Level Concepts)
Definition
Microblading uses a handheld blade of grouped fine needles to create hair-like strokes by implanting pigment into the dermis. At this level, the technique itself is assumed to be established. What matters now is the thinking that governs the technique: predicting how specific skin will respond, engineering strokes for specific outcomes, and understanding the interactions between blade, pigment, and tissue that determine what the client sees six weeks later.
The gap between a competent microblading practitioner and a master is not hand skill. It is prediction. The master knows, before placing the first stroke, approximately what the healed result will look like on this particular client's skin. That predictive ability comes from understanding the variables covered in this chapter.
Theory
Skin Architecture and Stroke Behaviour
The dermis is not uniform. It varies in thickness, collagen density, and elastin content between individuals, between skin types, and between regions of the same face. The brow area alone presents variation: the head zone skin is often thinner with less subcutaneous fat, while the body and arch zones sit over denser tissue with more structural support.
These variations directly affect stroke behaviour. In collagen-dense skin, the blade meets firm resistance and the wound channel holds its shape precisely, producing crisp strokes that retain well. In looser, more elastic skin, the wound channel can spread slightly as the tissue rebounds, producing strokes that appear wider than intended and may blur during healing. In oily skin, sebum production interferes with pigment adhesion in the wound channel, reducing retention and potentially causing strokes to diffuse.
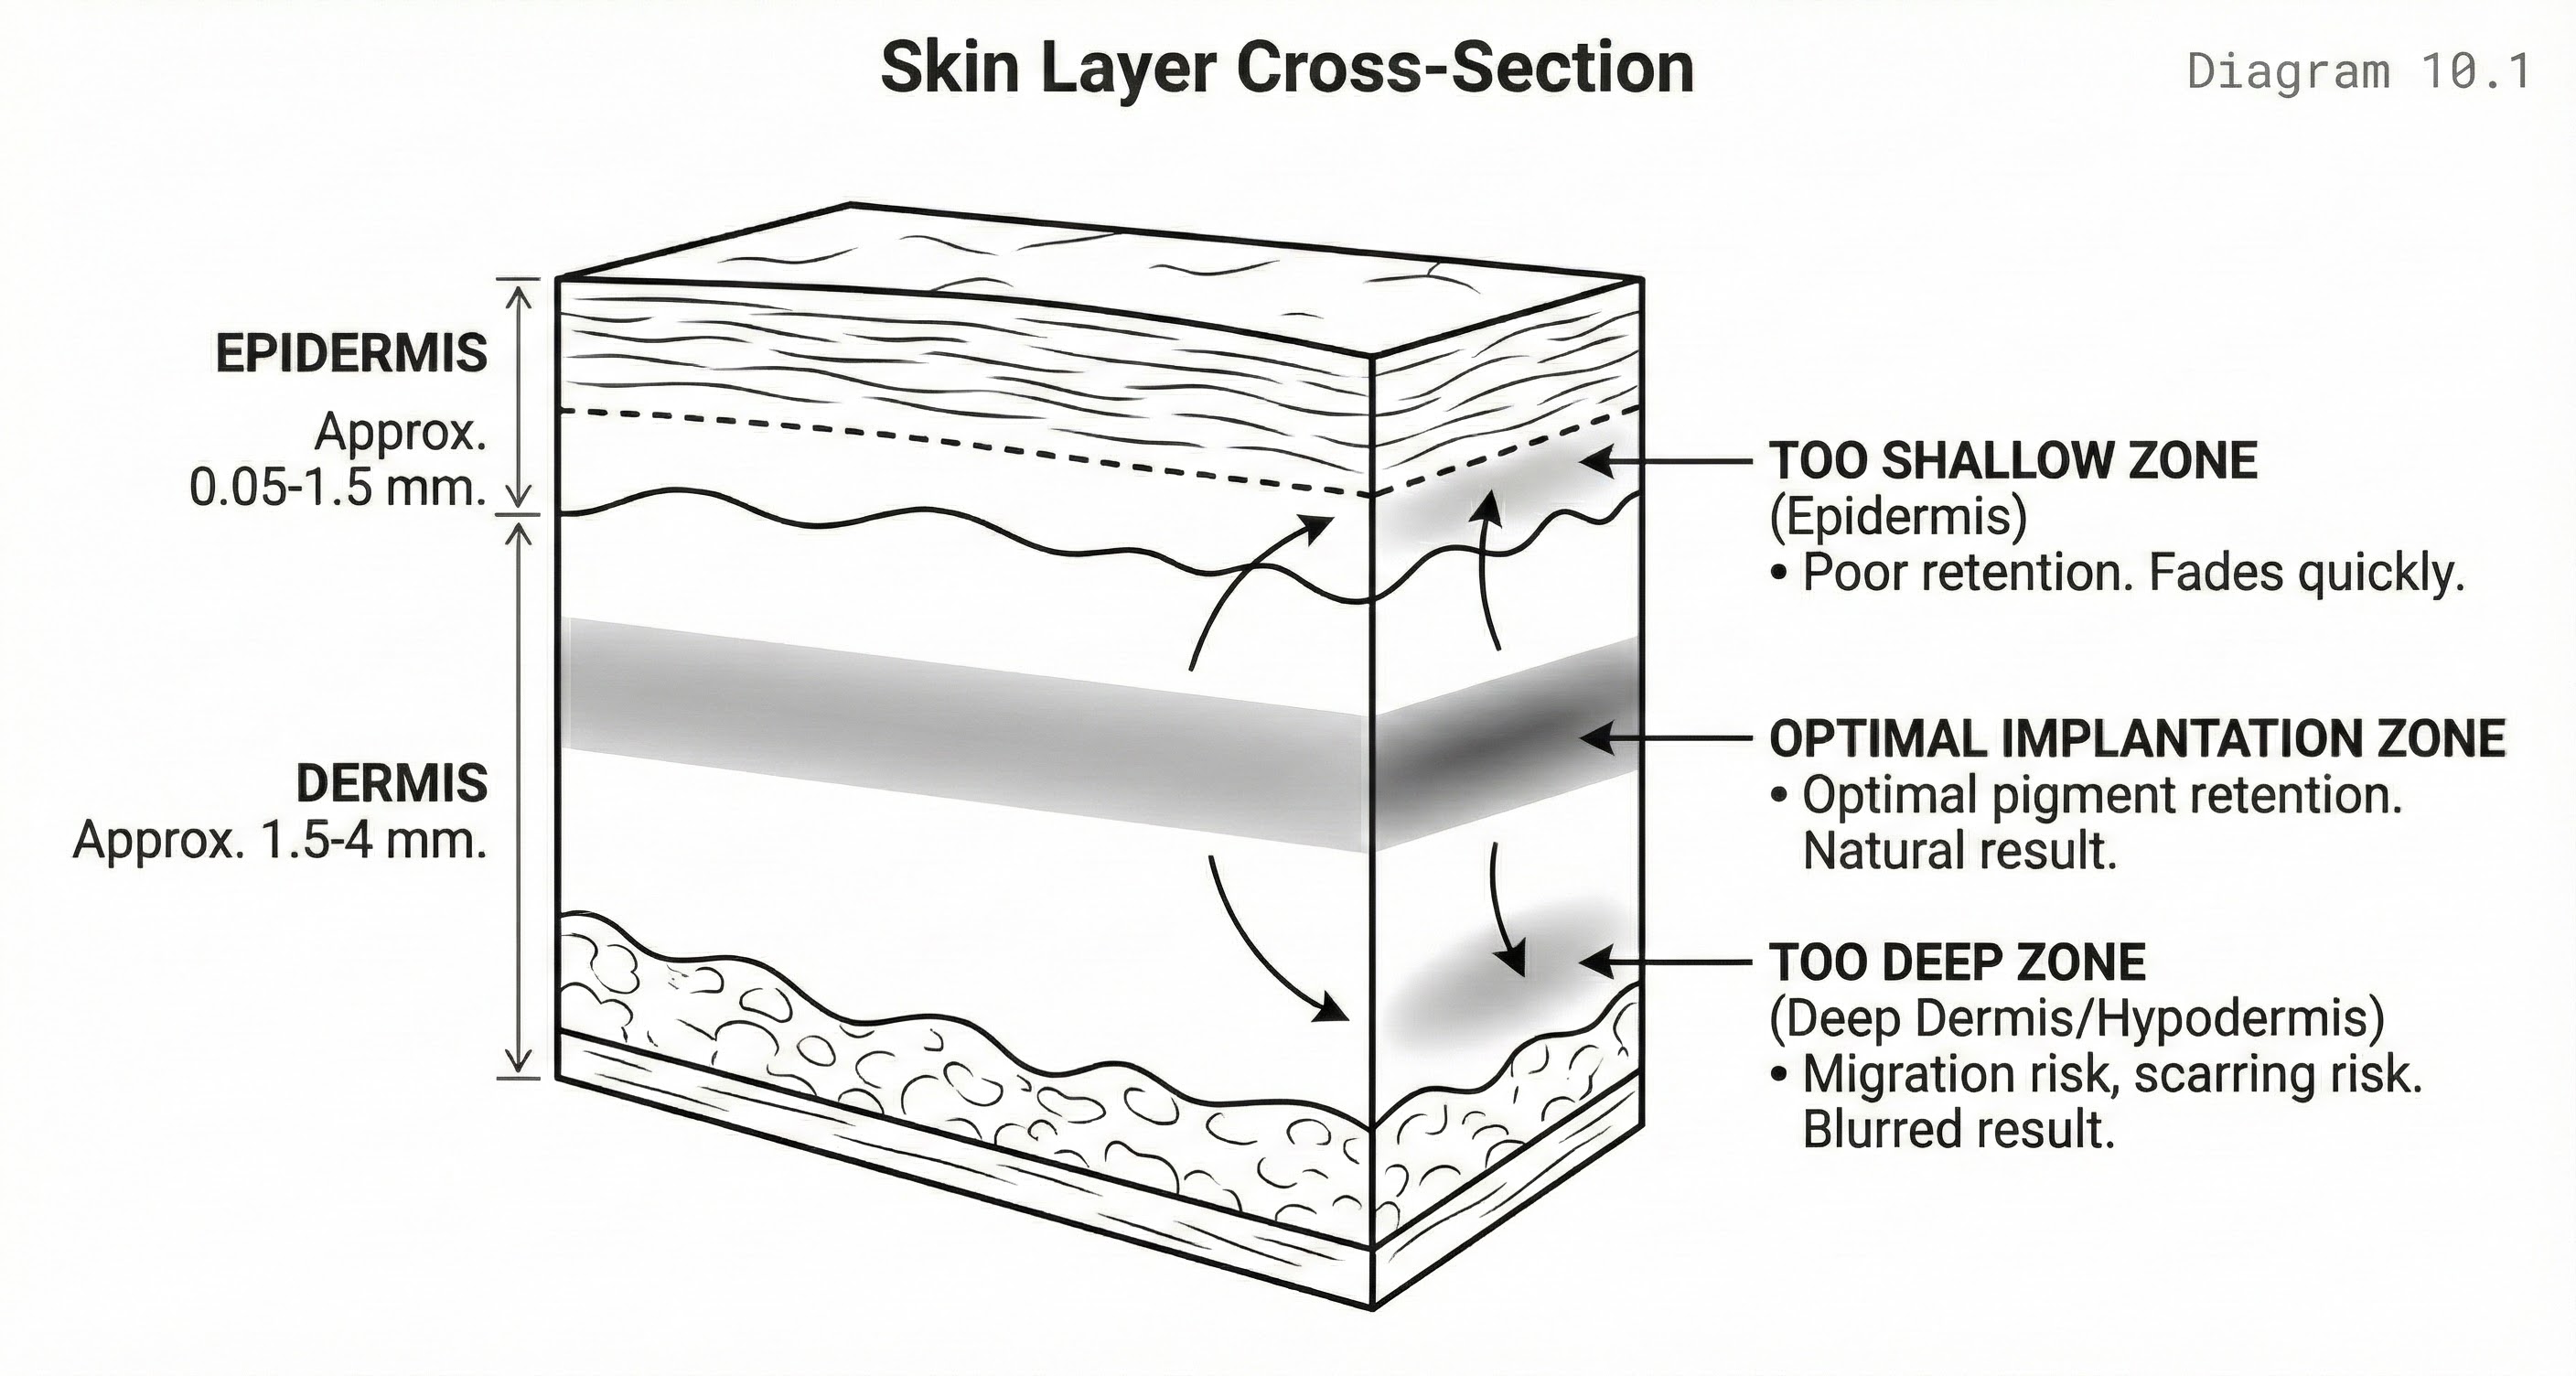
Skin Layer Cross-Section
Purpose: Illustrate implantation depth target zone
A cross-section through skin showing epidermis layers, papillary dermis, and reticular dermis. The optimal pigment implantation zone is highlighted in the upper dermis. Blade penetration depth is indicated.
Wound Healing and Stroke Evolution
Every stroke is a controlled wound that passes through three healing phases. The inflammatory phase (days 1 to 5) brings swelling and redness as the body responds to tissue disruption. Strokes appear darker and bolder than they will heal because surface pigment and inflammation exaggerate the colour. The proliferative phase (days 5 to 14) involves tissue regeneration: the epidermis reforms over the wound channels, often producing visible scabbing or flaking that alarms clients who have not been properly educated. During this phase, strokes may appear to vanish entirely as new skin forms over the pigment.
The remodelling phase (weeks 3 to 8) is where the healed result emerges. Collagen reorganises around the pigment deposits, and the strokes settle into their final appearance. Strokes typically appear 30 to 50 percent lighter than immediately after the procedure, softer at the edges, and slightly wider. The practitioner who understands this trajectory works with it rather than against it: placing strokes slightly crisper and more saturated than the desired final result, anticipating the softening that healing produces.
Stroke Geometry
The three-dimensional shape of the wound channel determines how pigment is held and how the stroke heals. A narrow, deep channel concentrates pigment in a tight line, producing a crisp healed stroke but carrying higher risk of migration if depth exceeds the papillary dermis. A wide, shallow channel distributes pigment broadly, producing a softer stroke with better retention in the target zone but less definition.
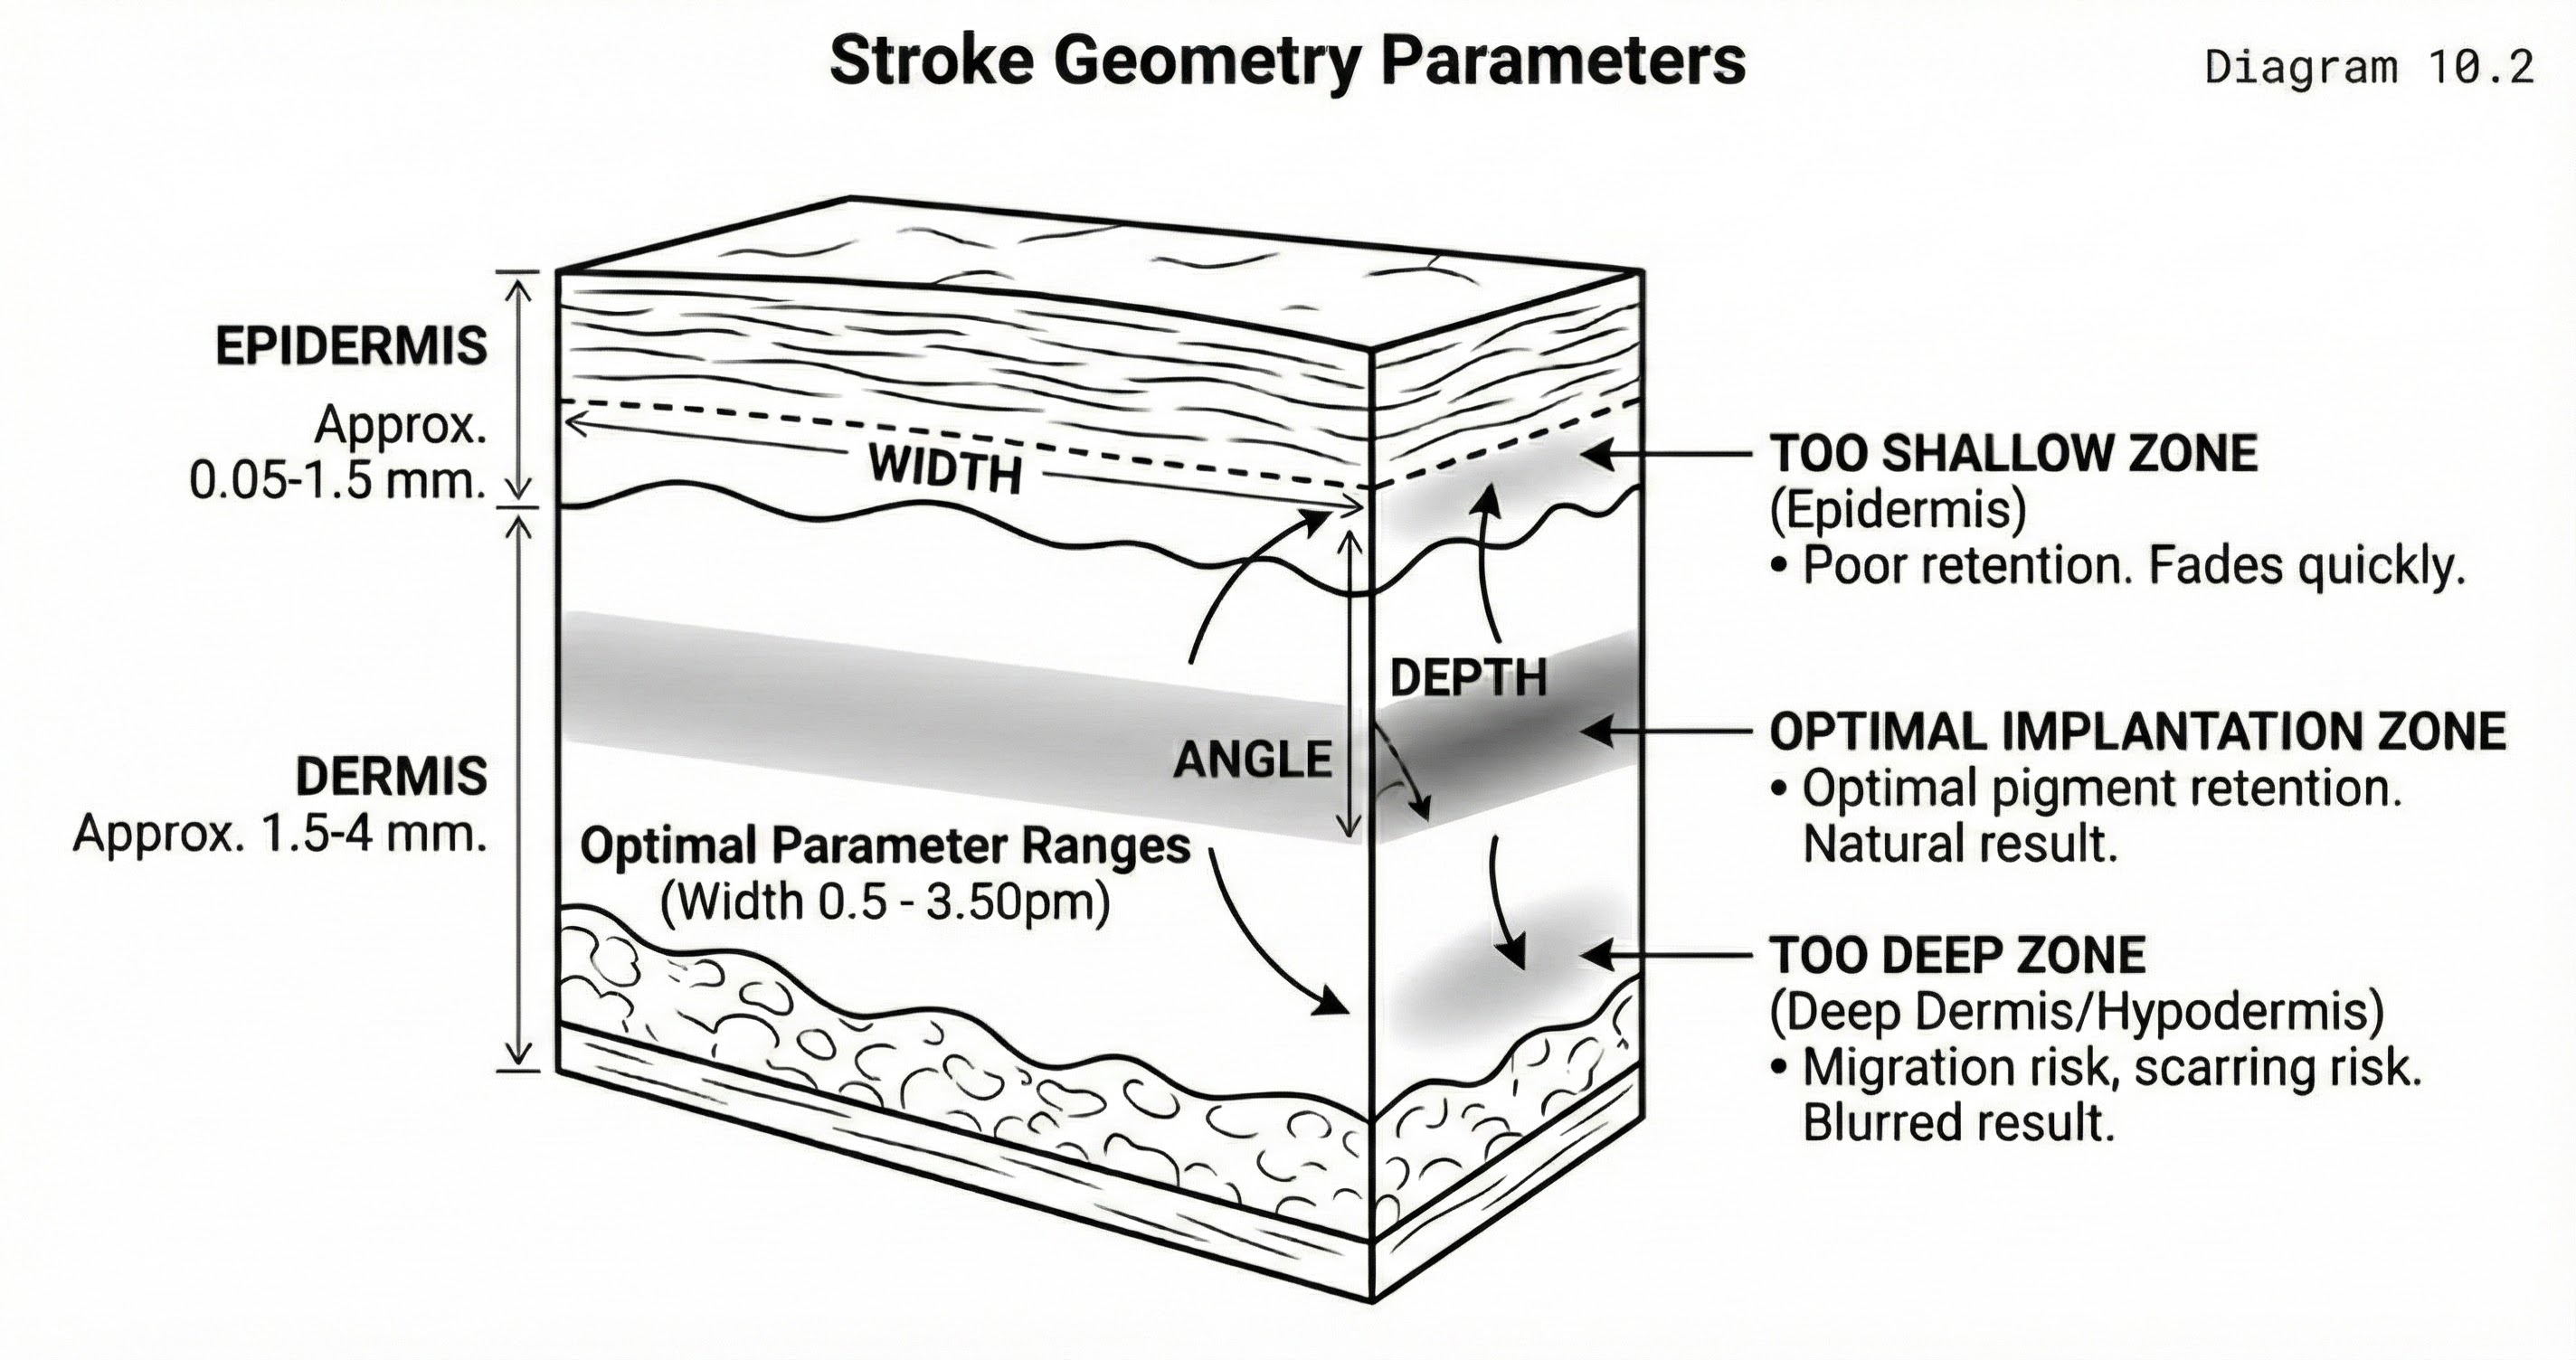
Stroke Geometry Parameters
Purpose: Define the three-dimensional characteristics of a stroke wound
A three-dimensional representation of a blade stroke wound showing depth, width, and angle parameters. Cross-sections at different points along the stroke show varying geometry.
Pigment Migration and Retention
Implanted pigment does not always stay where it is placed. Migration occurs when pigment particles move beyond the original wound boundaries, causing strokes to blur, spread, or develop haloes. The primary causes are excessive depth (pigment enters the reticular dermis where the looser tissue structure allows lateral movement), excessive trauma (over-worked tissue swells and displaces pigment), and inappropriate pigment viscosity (overly liquid formulations spread beyond the wound channel before the tissue seals).
Retention is governed by the balance between how securely pigment is held in the dermis and how aggressively the body's immune response clears it. Factors working against retention include oily skin (sebum disrupts pigment adhesion), shallow depth (pigment sits in the epidermis and is lost through normal cell turnover), aggressive aftercare (premature washing or exfoliation), and sun exposure (UV breaks down pigment compounds). Factors supporting retention include optimal depth (upper papillary dermis), appropriate pigment particle size, compliant aftercare, and the client's individual immune response.
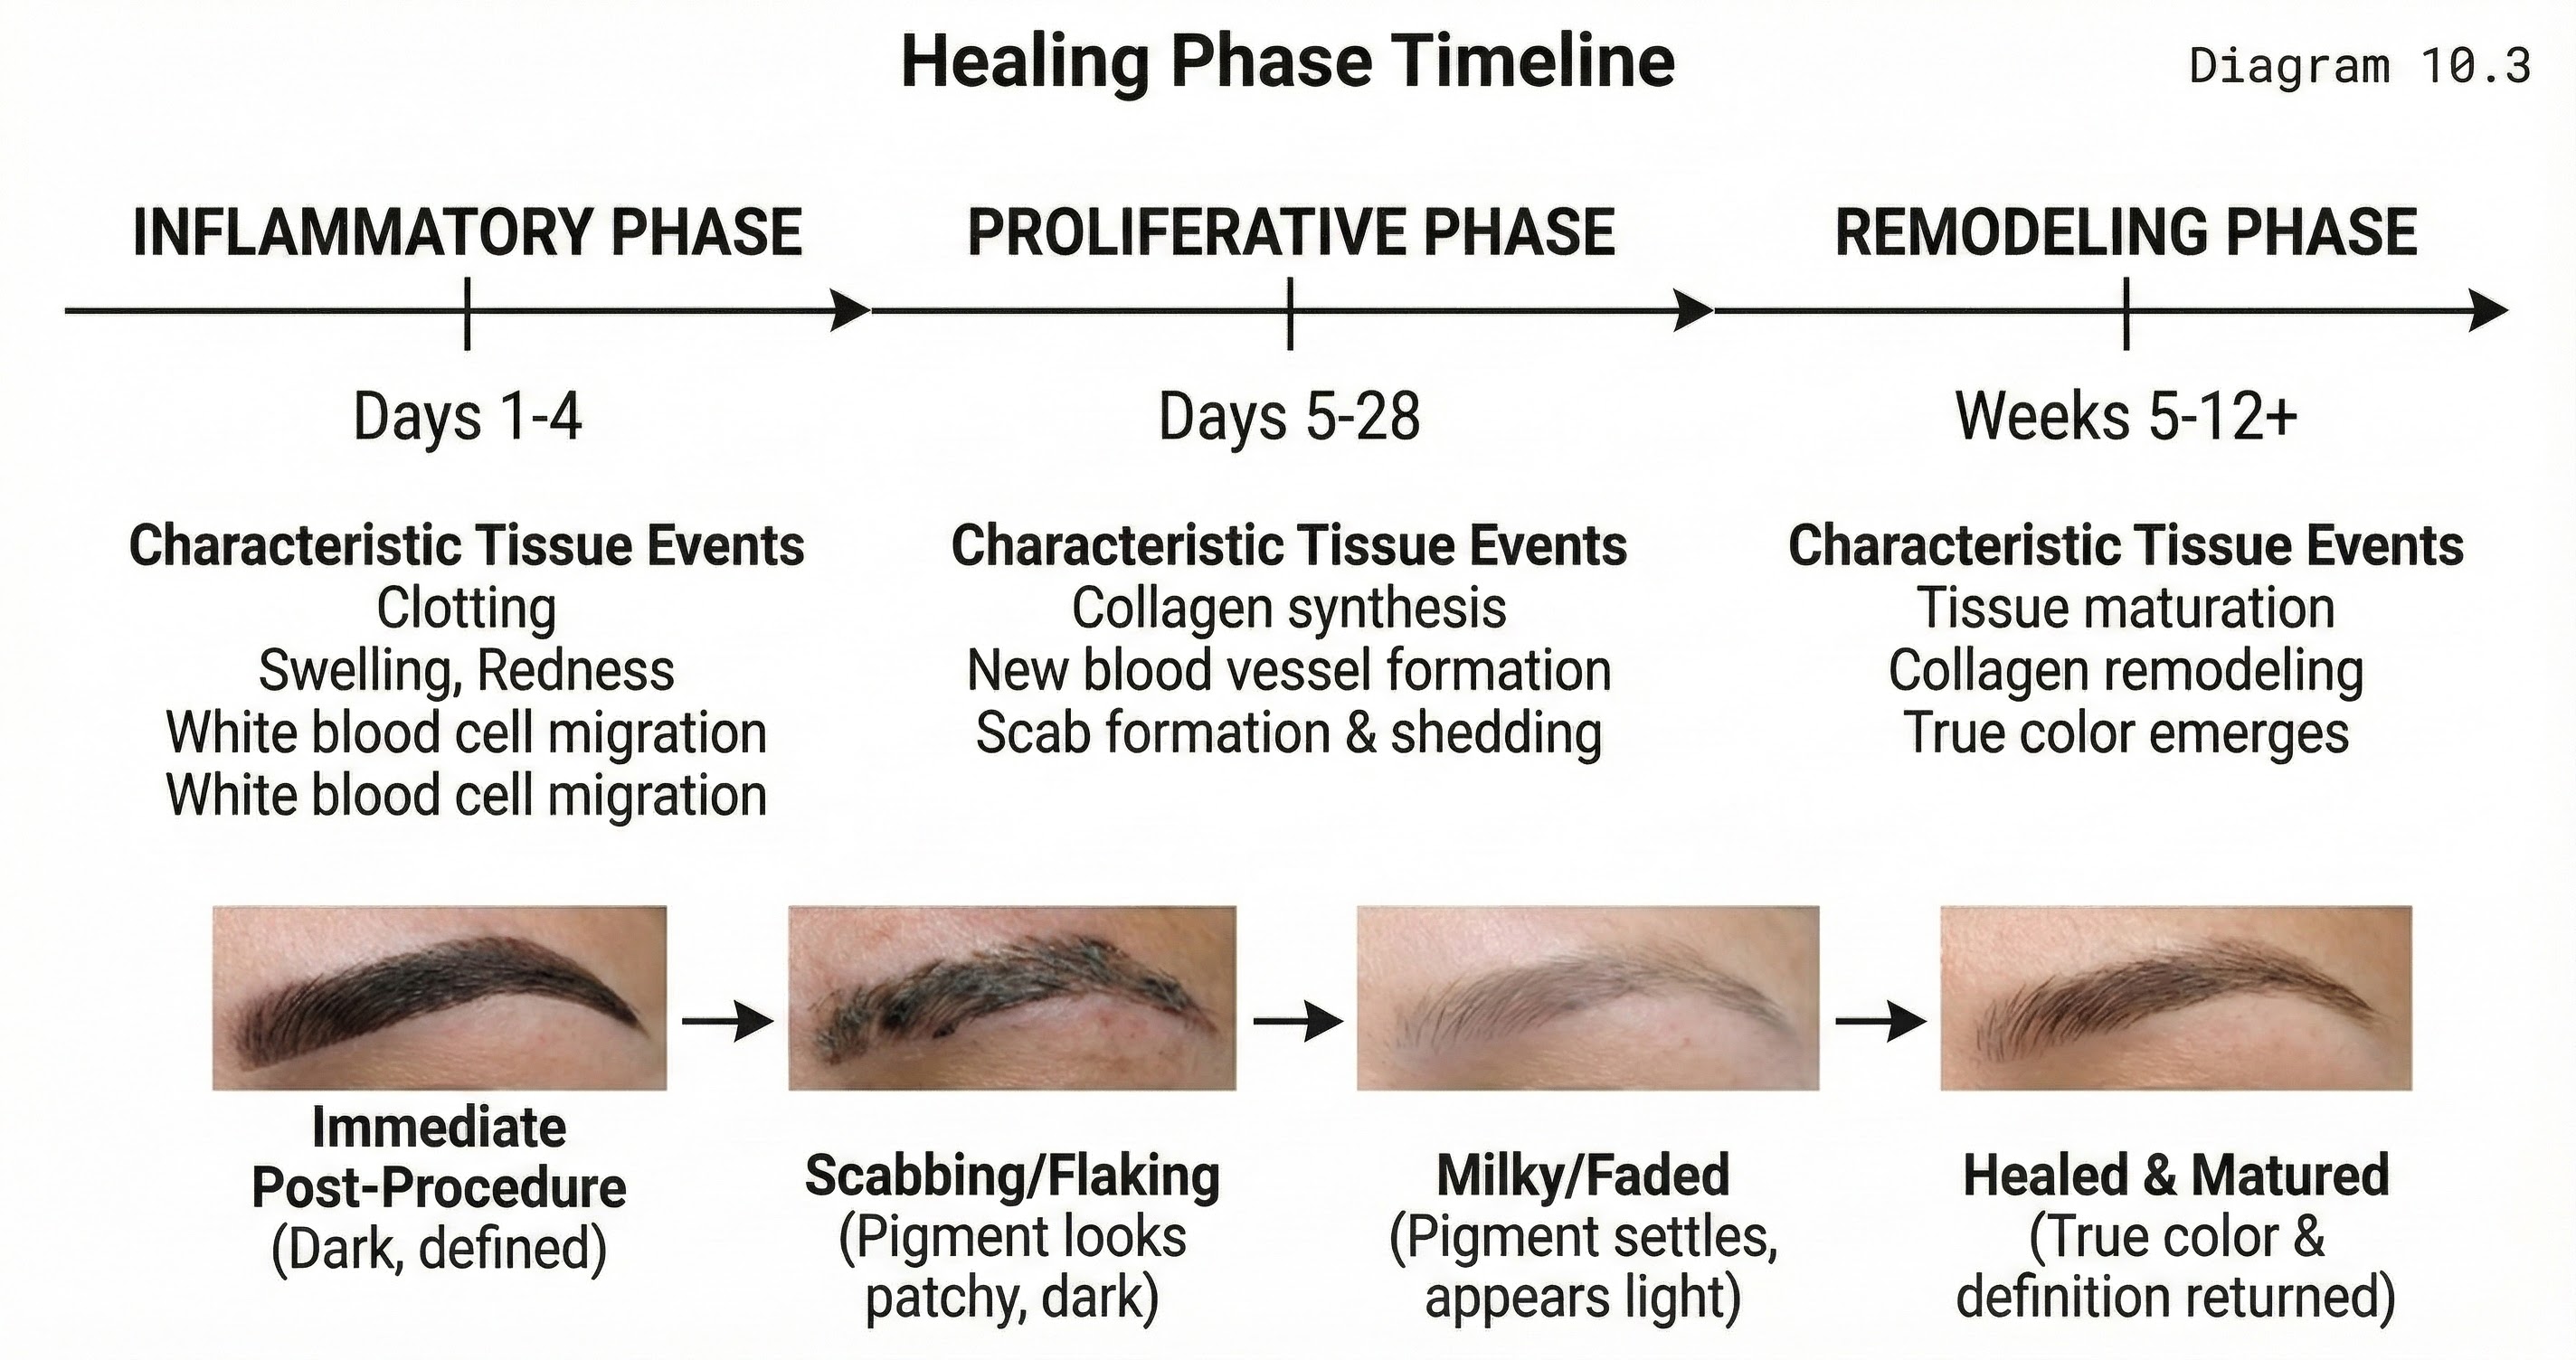
Healing Phase Timeline
Purpose: Show tissue events during healing
A timeline showing the three phases of wound healing: inflammatory (days 1-3), proliferative (days 4-14), and remodeling (weeks 2-8). Key tissue events are noted at each phase.
Methodology
Pre-Procedure Skin Assessment
Before selecting a blade or mixing pigment, assess the skin systematically. Evaluate thickness by observing how the brow area skin responds to light pressure and by noting visible characteristics: thin skin shows veins and bone structure more readily; thick skin appears smoother with less visible underlying structure. Assess oiliness through surface observation and client history (does the client report an oily T-zone? Do they blot during the day?). Note sensitivity indicators: redness, visible capillaries, history of reactive responses to topical products.
Each observation informs a technique decision. Thin skin requires lighter pressure, shallower depth targets, and fewer passes. Oily skin may require a blade configuration that carries more pigment per pass to compensate for reduced retention. Sensitive skin requires gentler technique and potentially adjusted aftercare protocols.
Technique Selection
Match your approach to the assessed skin. For dense, collagen-rich skin (typically younger clients with normal oil levels), standard pressure and depth produce reliable results. For thin or mature skin, reduce pressure, use a finer blade, and accept that fewer passes will be needed. For oily skin, consider whether microblading is the optimal technique at all, or whether machine work with its different pigment delivery mechanism might produce better retention. This is a diagnostic decision, not a technique limitation.
Depth Calibration
Calibrate on the first strokes of every procedure. Place two to three strokes in the body zone (where additional work will overlay them) and observe the tissue response. The target indicators are: a fine line of pinpoint bleeding confirming papillary dermis penetration, clean pigment sitting in the channel without pooling or spreading, and no excessive bleeding or tissue blanching suggesting you have gone too deep. If the initial strokes do not produce these indicators, adjust depth before proceeding.
Techniques
Pressure Modulation
Pressure is not constant. It varies with zone (the head zone over thinner tissue requires less pressure than the body zone over denser tissue), with stroke direction (strokes against the natural grain may require slightly different pressure than strokes with it), and with procedure duration (tissue response changes as mild swelling develops, altering the pressure-depth relationship). The skilled practitioner maintains awareness of these variables and adjusts continuously rather than operating on a single calibrated pressure throughout.
Skin Stretch
Appropriate stretch tension is critical for clean blade entry. Insufficient stretch allows the skin to compress and deflect rather than accepting the blade cleanly, producing ragged or shallow strokes. Excessive stretch thins the skin and can cause the blade to penetrate too deeply. The optimal tension creates a taut, firm surface that the blade enters smoothly. Stretch direction matters: stretch perpendicular to the stroke direction for best results.
Pass Management
Single-pass technique prioritises tissue integrity: one clean stroke, minimal trauma, reliance on optimal depth and pigment quality for retention. Multi-pass technique builds saturation through repeated pigment deposits in the same channel, potentially improving retention but increasing trauma. The decision between approaches depends on skin type (oily skin may benefit from a careful second pass; thin skin is best served by a single precise pass) and the calibration results from initial strokes.
Professional Notes
Document everything. Record your blade selection, pressure observations, skin assessment findings, and any mid-procedure adjustments for every client. Photograph the result immediately post-procedure and at follow-up. Over time, this documentation becomes your personal reference for predicting outcomes on different skin presentations. Without it, you are relying on memory, which is unreliable and non-transferable.
The quality gap between fresh and healed results is where most client dissatisfaction originates. Educate thoroughly before the procedure, set expectations with healing timeline photos from previous clients, and schedule a check-in at day 7 when anxiety peaks. Prevention is easier than repair.
Common Mistakes
Inconsistent depth across the brow. This produces the characteristic patchy healed result where some strokes retain crisply while adjacent strokes fade to near-invisibility. The cause is usually autopilot: the practitioner calibrates at the start and then stops paying attention to tissue feedback. Maintain conscious depth awareness throughout.
Misjudging skin type. Applying a standard technique to oily skin, or treating mature skin with the same pressure used on younger skin, produces predictable failures. Skin assessment is not a formality. It is the decision that determines whether your technique will work.
Over-working the tissue. The instinct when strokes appear insufficiently saturated is to add more passes. On some skin types this works. On thin, sensitive, or already-traumatised tissue, additional passes create swelling and damage that compromise the result. Know when to stop. A slightly under-saturated first session with a clean touch-up at six weeks produces better outcomes than an over-worked first session that heals with blurring and scarring.
Expert Insights
Experienced practitioners develop outcome prediction as an almost intuitive skill. After assessing the skin, selecting the blade, and placing the first calibration strokes, they can estimate the healed result with reasonable accuracy. This predictive ability is not intuition in the mystical sense. It is pattern recognition built from hundreds of documented cases where initial presentation, technique decisions, and healed outcomes were systematically recorded and reviewed.
The most sophisticated technical decision is sometimes choosing not to microblade at all. Certain skin presentations (severely oily, extensively scarred, extremely thin) may be better served by machine techniques, powder application, or a combination approach. The master practitioner's loyalty is to the client's outcome, not to a particular technique.
Practical Application
Before each procedure, conduct a deliberate skin assessment and record your findings. Make explicit technique decisions based on that assessment: blade configuration, target depth, anticipated number of passes, pigment selection. Write these down. This forces conscious decision-making rather than habitual defaults.
During the procedure, calibrate on the first strokes, confirm your technique is producing the intended tissue response, and reassess at the midpoint. After the procedure, photograph the immediate result and note anything unexpected. At the follow-up appointment, compare the healed result to your predictions and your documentation. Where predictions were accurate, your assessment methodology is working. Where they were not, investigate why and adjust your mental model.