Section App. 11: Blade Mechanics, Pressure Control & Edge Behaviour
Definition
Blade mechanics is the study of how your tool interacts with skin tissue during stroke creation. This encompasses three interconnected variables: the physical configuration of the needle or blade (its arrangement, gauge, and flexibility), the pressure applied through it, and the angle at which it meets the skin. Together, these determine what happens beneath the surface and how the stroke heals.
This is not abstract theory. Every stroke you place is governed by these mechanics, whether you understand them or not. The practitioner who selects a blade deliberately, calibrates pressure to the assessed skin, and controls angle throughout the stroke produces consistent, predictable results. The practitioner who uses the same configuration on every client produces inconsistent results and cannot diagnose why.
Theory
How Blades Cut
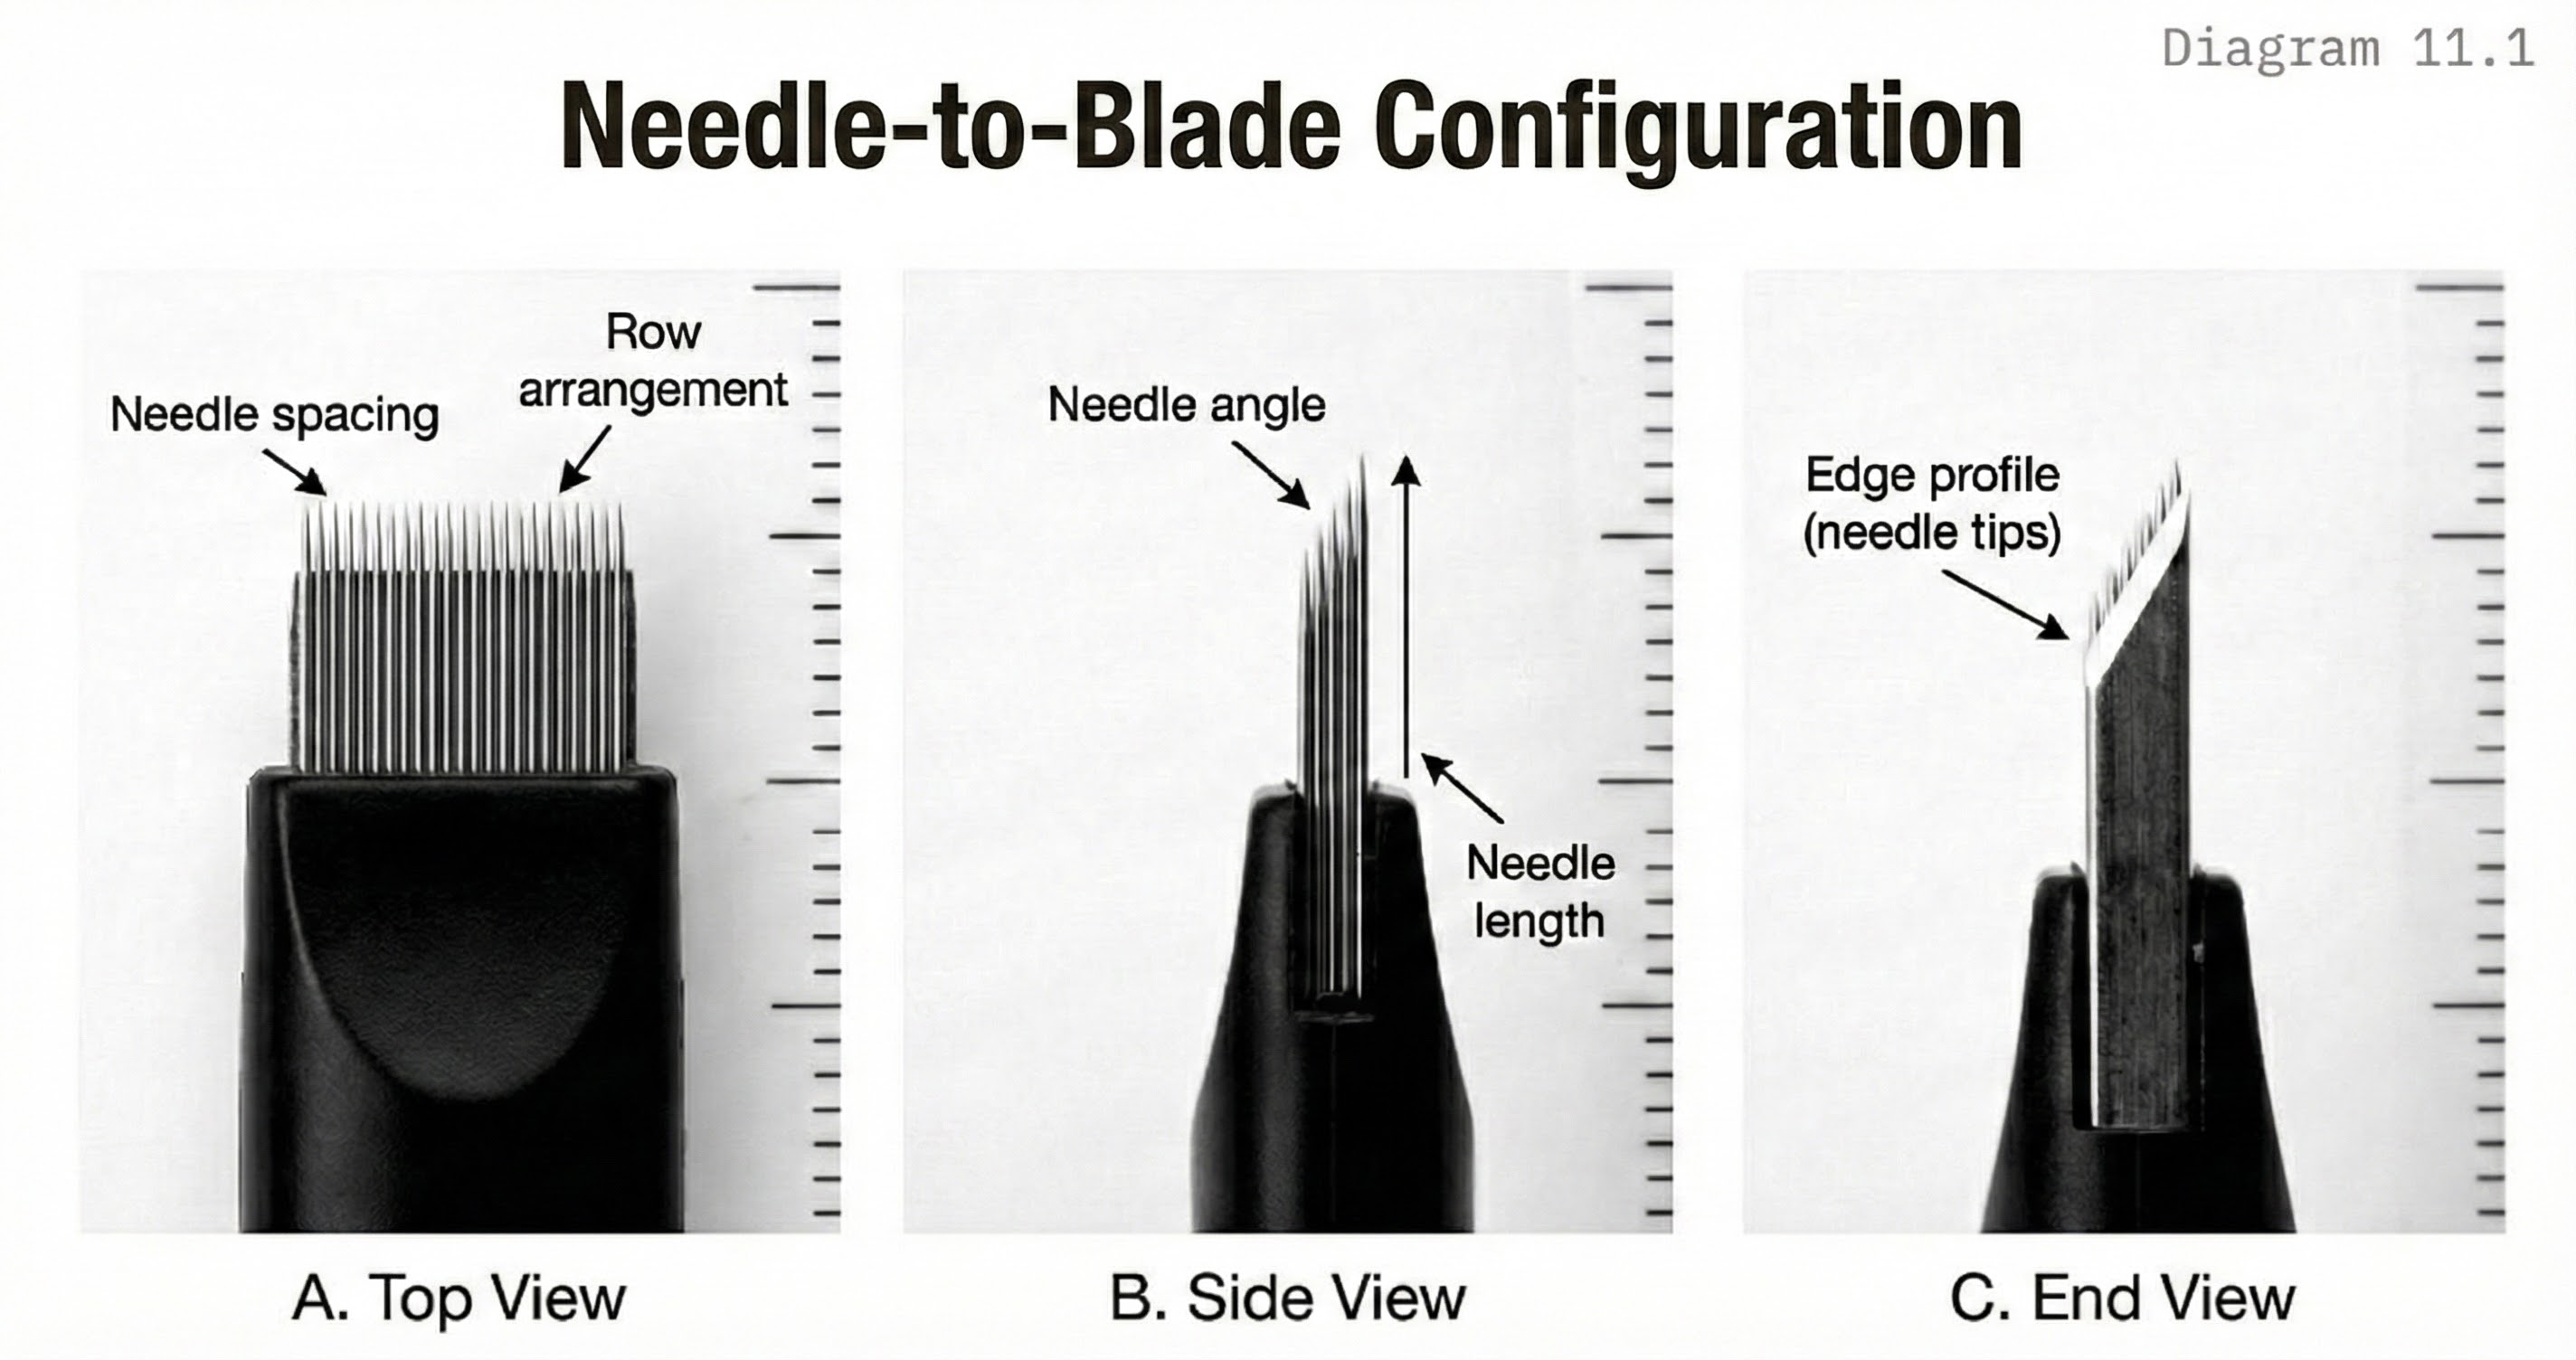
A microblading blade does not slice like a scalpel. Multiple needle points arranged along the blade edge create closely spaced punctures that merge into what appears as a continuous stroke. The spacing between these needle points determines stroke width. The number of needles determines how much pigment the blade carries per pass. The arrangement (flat, curved, or staggered) determines the shape of the wound channel and therefore the shape of the healed stroke.
Machine needles operate differently. A single needle or small cluster punctures the skin repeatedly at high speed, depositing pigment through rapid vertical penetration rather than a drawing motion. The cartridge configuration (liner, shader, magnum) determines the puncture pattern and therefore the effect: crisp individual dots that read as a stroke, soft diffused shading, or broad coverage.
Needle-to-Blade Configuration
Purpose: Show blade construction and needle arrangements
Multiple views of blade construction: frontal view showing needle arrangement, side view showing needle angle, and detail view of needle tip geometry. Different configurations (U-blade, flat, nano) are compared.
Pressure and Depth
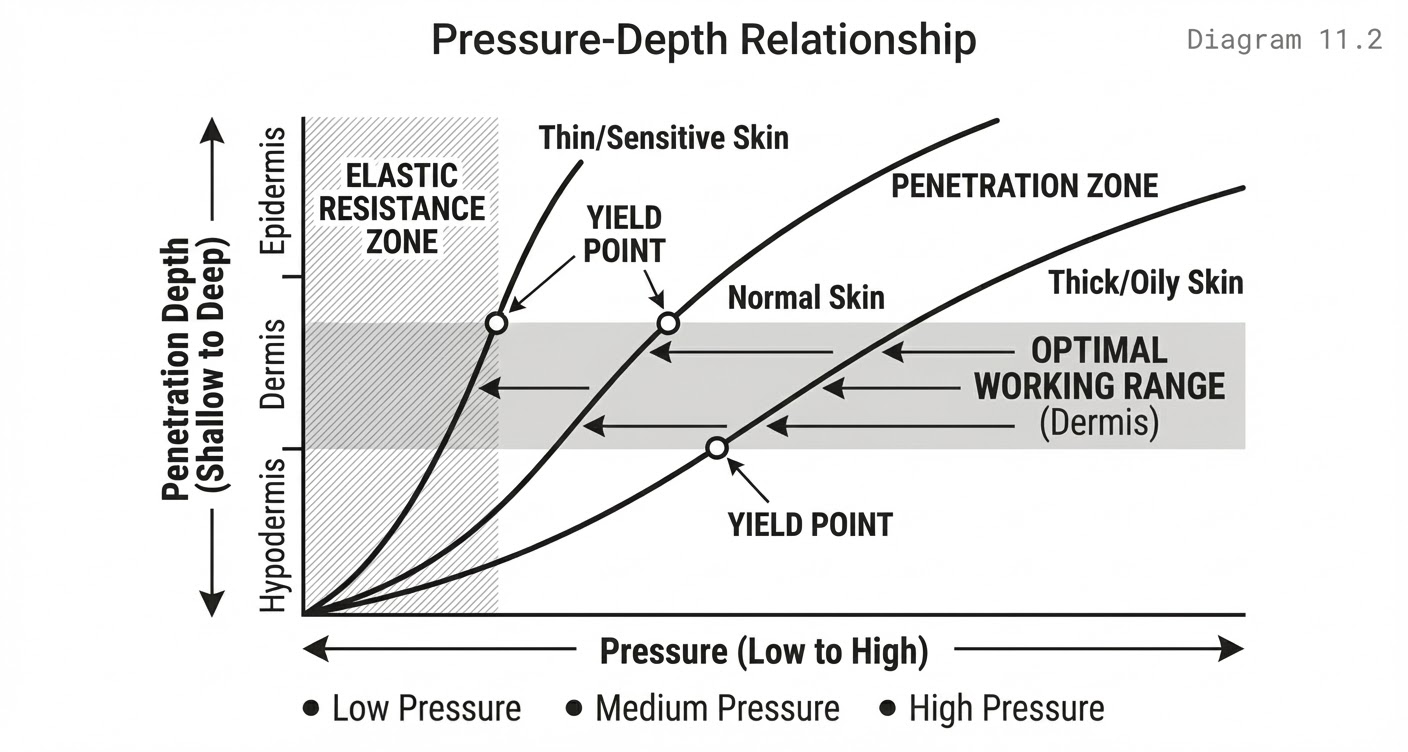
The relationship between applied pressure and penetration depth is not linear. Skin has an elastic threshold: it resists initial pressure, then yields relatively suddenly once that threshold is exceeded. This means small increases in pressure near the threshold can produce disproportionate increases in depth. The threshold varies by skin type, by location on the face, and even by zone within the brow.
Oily, thick skin typically has a higher resistance threshold but yields more dramatically once breached. The practitioner must apply more initial pressure but exercise greater control to avoid overshooting into the reticular dermis. Thin, dry skin has a lower threshold and yields more gradually, allowing finer pressure control but requiring lighter technique to avoid trauma. Mature skin with reduced elasticity responds differently again: the resistance-yield curve flattens, making depth control less intuitive.
Pressure-Depth Relationship
Purpose: Illustrate how pressure affects penetration across skin types
A graph with pressure on the x-axis and depth on the y-axis. Multiple curves represent different skin types (thin/normal/thick). Optimal zone is highlighted.
Angle and Stroke Quality
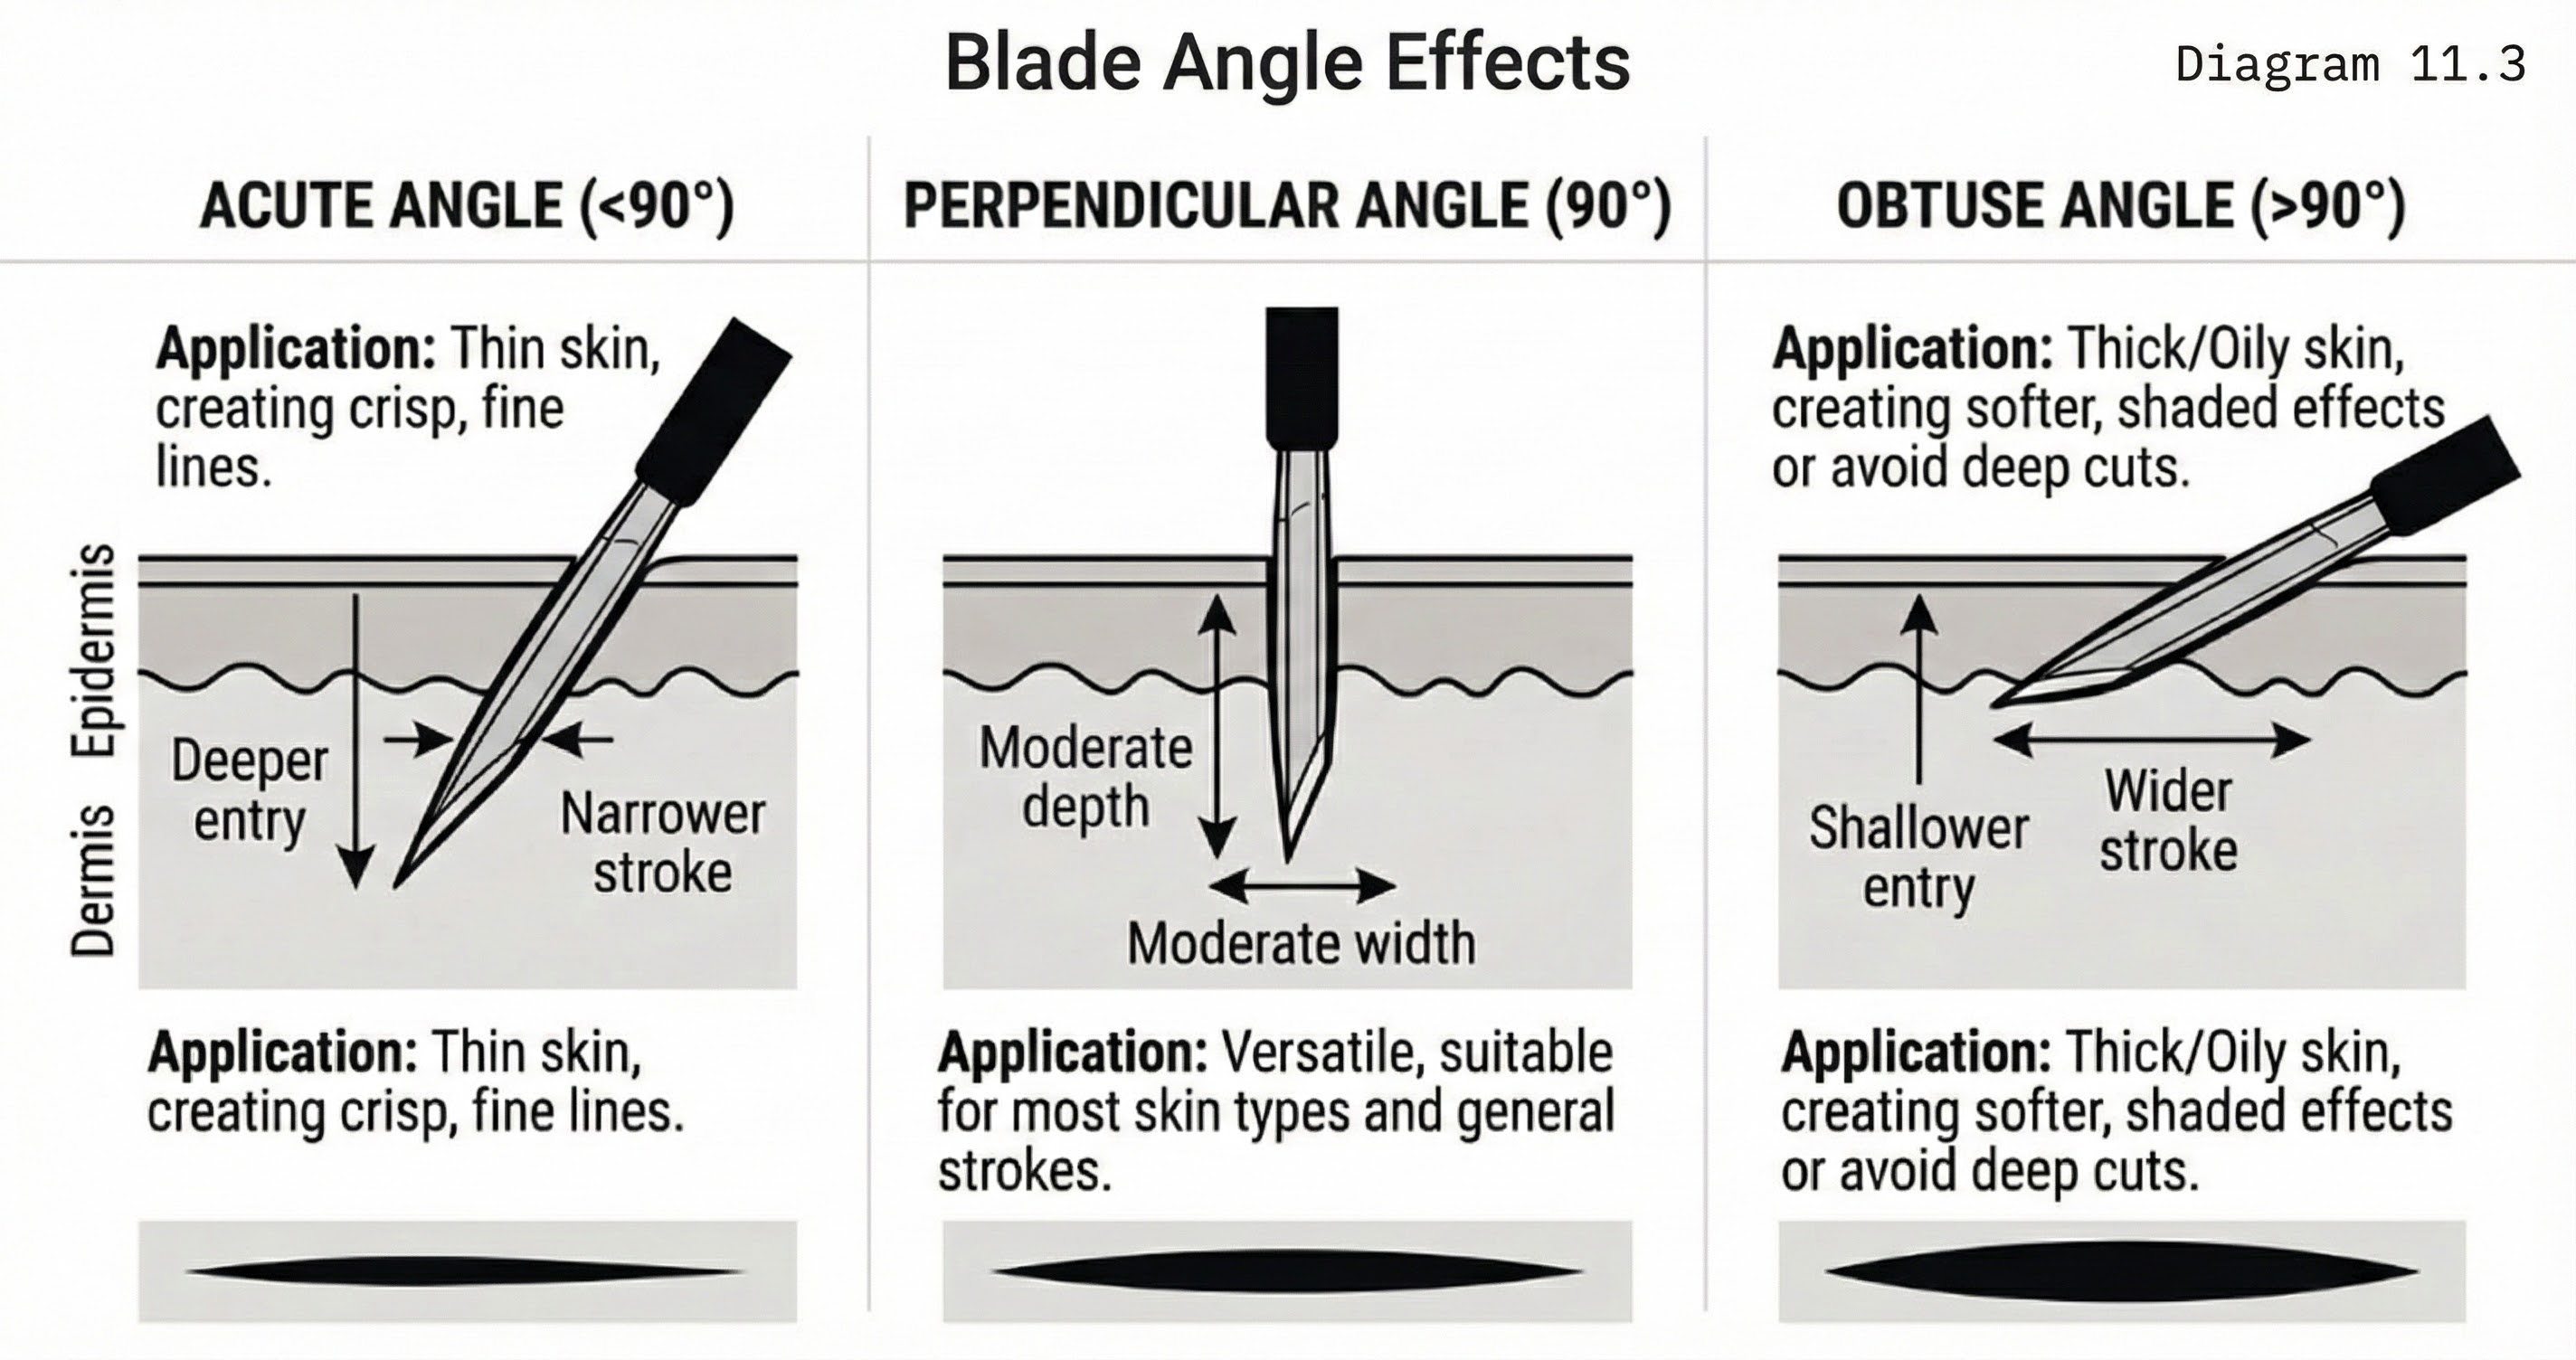
Blade entry angle affects both the geometry of the wound channel and the distribution of pigment within it. A steeper angle (60–90°) creates a narrower, deeper channel with pigment concentrated in a tight line. This produces crisp, defined strokes that heal with clean edges. A shallower angle (30–50°) creates a wider, more superficial channel where pigment spreads laterally. This can produce softer strokes but risks placing pigment too superficially for adequate retention.
The optimal angle is not fixed. It depends on the zone (head zone strokes at different angles to tail zone strokes), the desired effect (crisp hairstroke versus soft fill), and the skin type (thicker skin may tolerate steeper angles; thinner skin may require moderate angles to avoid trauma). The diagnostic practitioner assesses these factors and adjusts angle accordingly rather than defaulting to a single angle for all work.
Blade Angle Effects
Purpose: Show how blade angle affects stroke characteristics
Three cross-sections showing blade entry at different angles (steep, moderate, shallow). Each shows resulting wound geometry and pigment distribution pattern.
Methodology
Blade Selection as Diagnostic Decision
Blade selection is not personal preference. It is a diagnostic decision made after skin assessment and before tool contact. The selection process considers three factors: the assessed skin type, the planned stroke pattern, and the target density for each zone.
For fine, naturalistic hairstrokes on normal-to-dry skin, a nano or fine-gauge blade offers the control and precision needed. For fuller coverage on thicker or oilier skin where strokes need to carry more pigment, a higher needle-count flat blade delivers better saturation per pass. For machine work, a round liner cartridge suits individual hairstroke simulation, while a curved magnum serves shading and ombré work. The practitioner who maintains a range of configurations and selects based on assessment will outperform the practitioner who relies on a single favourite tool.
Pressure Calibration
Calibrate pressure on every new client. Begin the first two to three strokes conservatively, in an area that will receive additional work (typically the body zone where density is highest). Observe the tissue response: Is there appropriate pinpoint bleeding indicating papillary dermis penetration? Is the pigment sitting cleanly in the channel? Is there excessive bleeding or visible trauma suggesting you have gone too deep?
Adjust based on observation, then maintain the calibrated pressure throughout. If you notice the tissue response changing during the procedure (which can happen as mild swelling develops), recalibrate. Pressure that was optimal at the start may become excessive thirty minutes in as inflammation alters the skin's resistance profile.
Angle Optimisation
During the same initial calibration strokes, assess angle. Examine the stroke crispness and width. If strokes are wider than intended, steepen the angle. If pigment is not depositing evenly along the stroke length, the angle may be too steep for the skin type, causing the blade to skip rather than glide. Find the angle that produces clean, consistent strokes in the specific tissue you are working with, and hold it.
Techniques
Graduated Pressure
Varying pressure within a single stroke creates tapered effects. Lighter pressure at the entry and exit points produces natural fade at both ends, mimicking how real hair tapers. Consistent pressure throughout produces a uniform stroke with defined endpoints. Both have applications: graduated pressure suits the head zone where soft, naturalistic strokes are needed; consistent pressure suits the body zone where structural definition matters.
Zone-Adapted Angle
The head zone typically calls for a slightly shallower angle to produce softer strokes that blend with the diffused natural growth pattern. The body and arch zones benefit from steeper angles for crisper definition. The tail zone may require angle adjustment as the skin thins and the brow narrows. Rather than holding a single angle across the entire brow, the skilled practitioner makes subtle adjustments at each transition.
Speed and Motion
Stroke speed affects pigment deposit. Too fast and the blade skims the surface, creating shallow, inconsistent strokes. Too slow and the blade dwells in tissue, creating excessive trauma and wider-than-intended channels. The optimal speed is steady and deliberate: fast enough to maintain clean forward motion, slow enough to maintain consistent depth. Jerky or hesitant motion produces the clubbing and skipping defects discussed in Module 5 of the Advanced course.
Professional Notes
Blade mechanics cannot be mastered through reading alone.The pressure-depth relationship, the feel of skin yielding, the feedback of a blade at correct versus incorrect angle — these develop only through deliberate, repetitive practice on practice media and supervised client work. Use the theoretical framework in this chapter to direct your practice sessions: work on one variable at a time (pressure only, then angle only, then combined), and document what you observe.
Blade quality degrades during use. Needles dull, flexibility changes, and cutting efficiency drops. If your strokes begin deteriorating mid-procedure and your technique has not changed, the blade may be the variable. Replace blades proactively rather than pushing a degraded tool and compromising the result. Never attribute to technique error what may be equipment failure.
Ergonomics directly affect blade control. Hand fatigue, poor body position, and client positioning that forces awkward wrist angles all degrade precision over the course of a procedure. Set up your workspace so that your dominant hand can maintain a neutral, relaxed wrist position throughout. If you notice precision dropping after thirty to forty minutes, pause. Stretch. Reset. Fatigue-related errors accumulate silently.
Common Mistakes
Using one blade configuration for all clients. This is the most common equipment error. Each skin type and design requirement calls for a considered tool selection. A nano blade that performs beautifully on thin, dry skin will underperform on thick, oily skin where it cannot carry sufficient pigment. A high-count flat blade that delivers excellent coverage on mature skin may create strokes that are too wide on younger, tighter skin.
Failing to recalibrate during the procedure. Skin response changes as the procedure progresses. Swelling, mild inflammation, and tissue fatigue alter the pressure-depth relationship. The practitioner who calibrates at the start and then operates on autopilot may find that strokes placed in the second half of the procedure are inconsistent with those placed in the first half.
Attributing tool problems to technique. When strokes begin skipping, becoming inconsistent, or depositing unevenly, practitioners often assume they are doing something wrong technically. Before adjusting your technique, check the blade. A dull or damaged blade cannot be compensated for by technical skill.
Ignoring angle in favour of pressure. When a stroke is not depositing well, the instinct is to press harder. Often the issue is angle rather than pressure. Pressing harder at the wrong angle creates trauma without improving deposit. Correct the angle first; adjust pressure second.
Expert Insights
Experienced practitioners develop what might be called blade-skin literacy: the ability to read the sensation of the blade entering tissue and to adjust in real time based on that feedback. The sound of the stroke, the resistance felt through the handle, the visual response of the tissue — these become a continuous feedback loop that informs micro-adjustments throughout the procedure. This literacy cannot be taught directly, but it can be cultivated by paying deliberate attention to sensory feedback during every stroke on every client.
Most experienced practitioners do develop preferred configurations, and that is fine. Preference is not the same as rigidity. Preference means reaching for a familiar tool first and adapting when assessment indicates it is not the right choice. Rigidity means using the same tool regardless of what the skin tells you. Know the difference.
Practical Application
Before each procedure, during your pre-service assessment, make an explicit blade selection decision. After assessing the client's skin type, thickness, and oil levels, choose the configuration that matches. Note your selection and your reasoning in your documentation. Over time, this builds a personal reference of what works on which presentations.
During the first three to five strokes, calibrate. Assess the tissue response, confirm your pressure and angle are producing the intended result, and adjust if needed. Do not proceed with full pattern execution until you are satisfied with the calibration strokes.
At the midpoint of the procedure, consciously reassess. Has the tissue response changed? Are your strokes still matching the quality of your calibration strokes? If not, identify which variable has shifted (pressure, angle, blade condition, tissue swelling) and correct before continuing.
After the procedure, review your documentation. What blade did you select? What pressure and angle worked? What adjustments did you make? This post-procedure reflection, accumulated over dozens of clients, is what builds the diagnostic equipment literacy that separates advanced practitioners from competent ones.