Section 2: Bone Structure Mapping for Brow Design
Definition
Bone structure mapping is the systematic process of identifying, documenting, and analysing the skeletal landmarks relevant to brow positioning and design. This mapping creates a structural blueprint that guides brow architecture decisions.
At the mastery level, bone mapping transcends simple landmark identification to encompass understanding of how skeletal configurations interact with brow placement to produce aesthetic outcomes.
The brow sits upon and relates to multiple skeletal structures: the frontal bone forming the forehead, the supraorbital ridge creating the brow platform, the orbital rim defining the eye socket boundary, and the nasal bones influencing medial brow positioning. Mapping these structures reveals the skeletal framework within which brow design operates.
Theory
Bone structure theory for brow design recognises that skeletal architecture establishes both possibilities and constraints. Certain brow positions and shapes harmonise with given skeletal configurations; others conflict with them. The goal of bone mapping is to identify the skeletal reality that must inform design decisions.
The Supraorbital Ridge
The supraorbital ridge presents the primary skeletal concern for brow design. This thickened region of the frontal bone creates a shelf-like structure above the eye socket.
Ridge prominence varies along its length—typically more pronounced laterally and less so medially—and this variation influences where the brow can most naturally sit.Designs that attempt to position brows contrary to ridge contour face ongoing conflict with underlying structure.
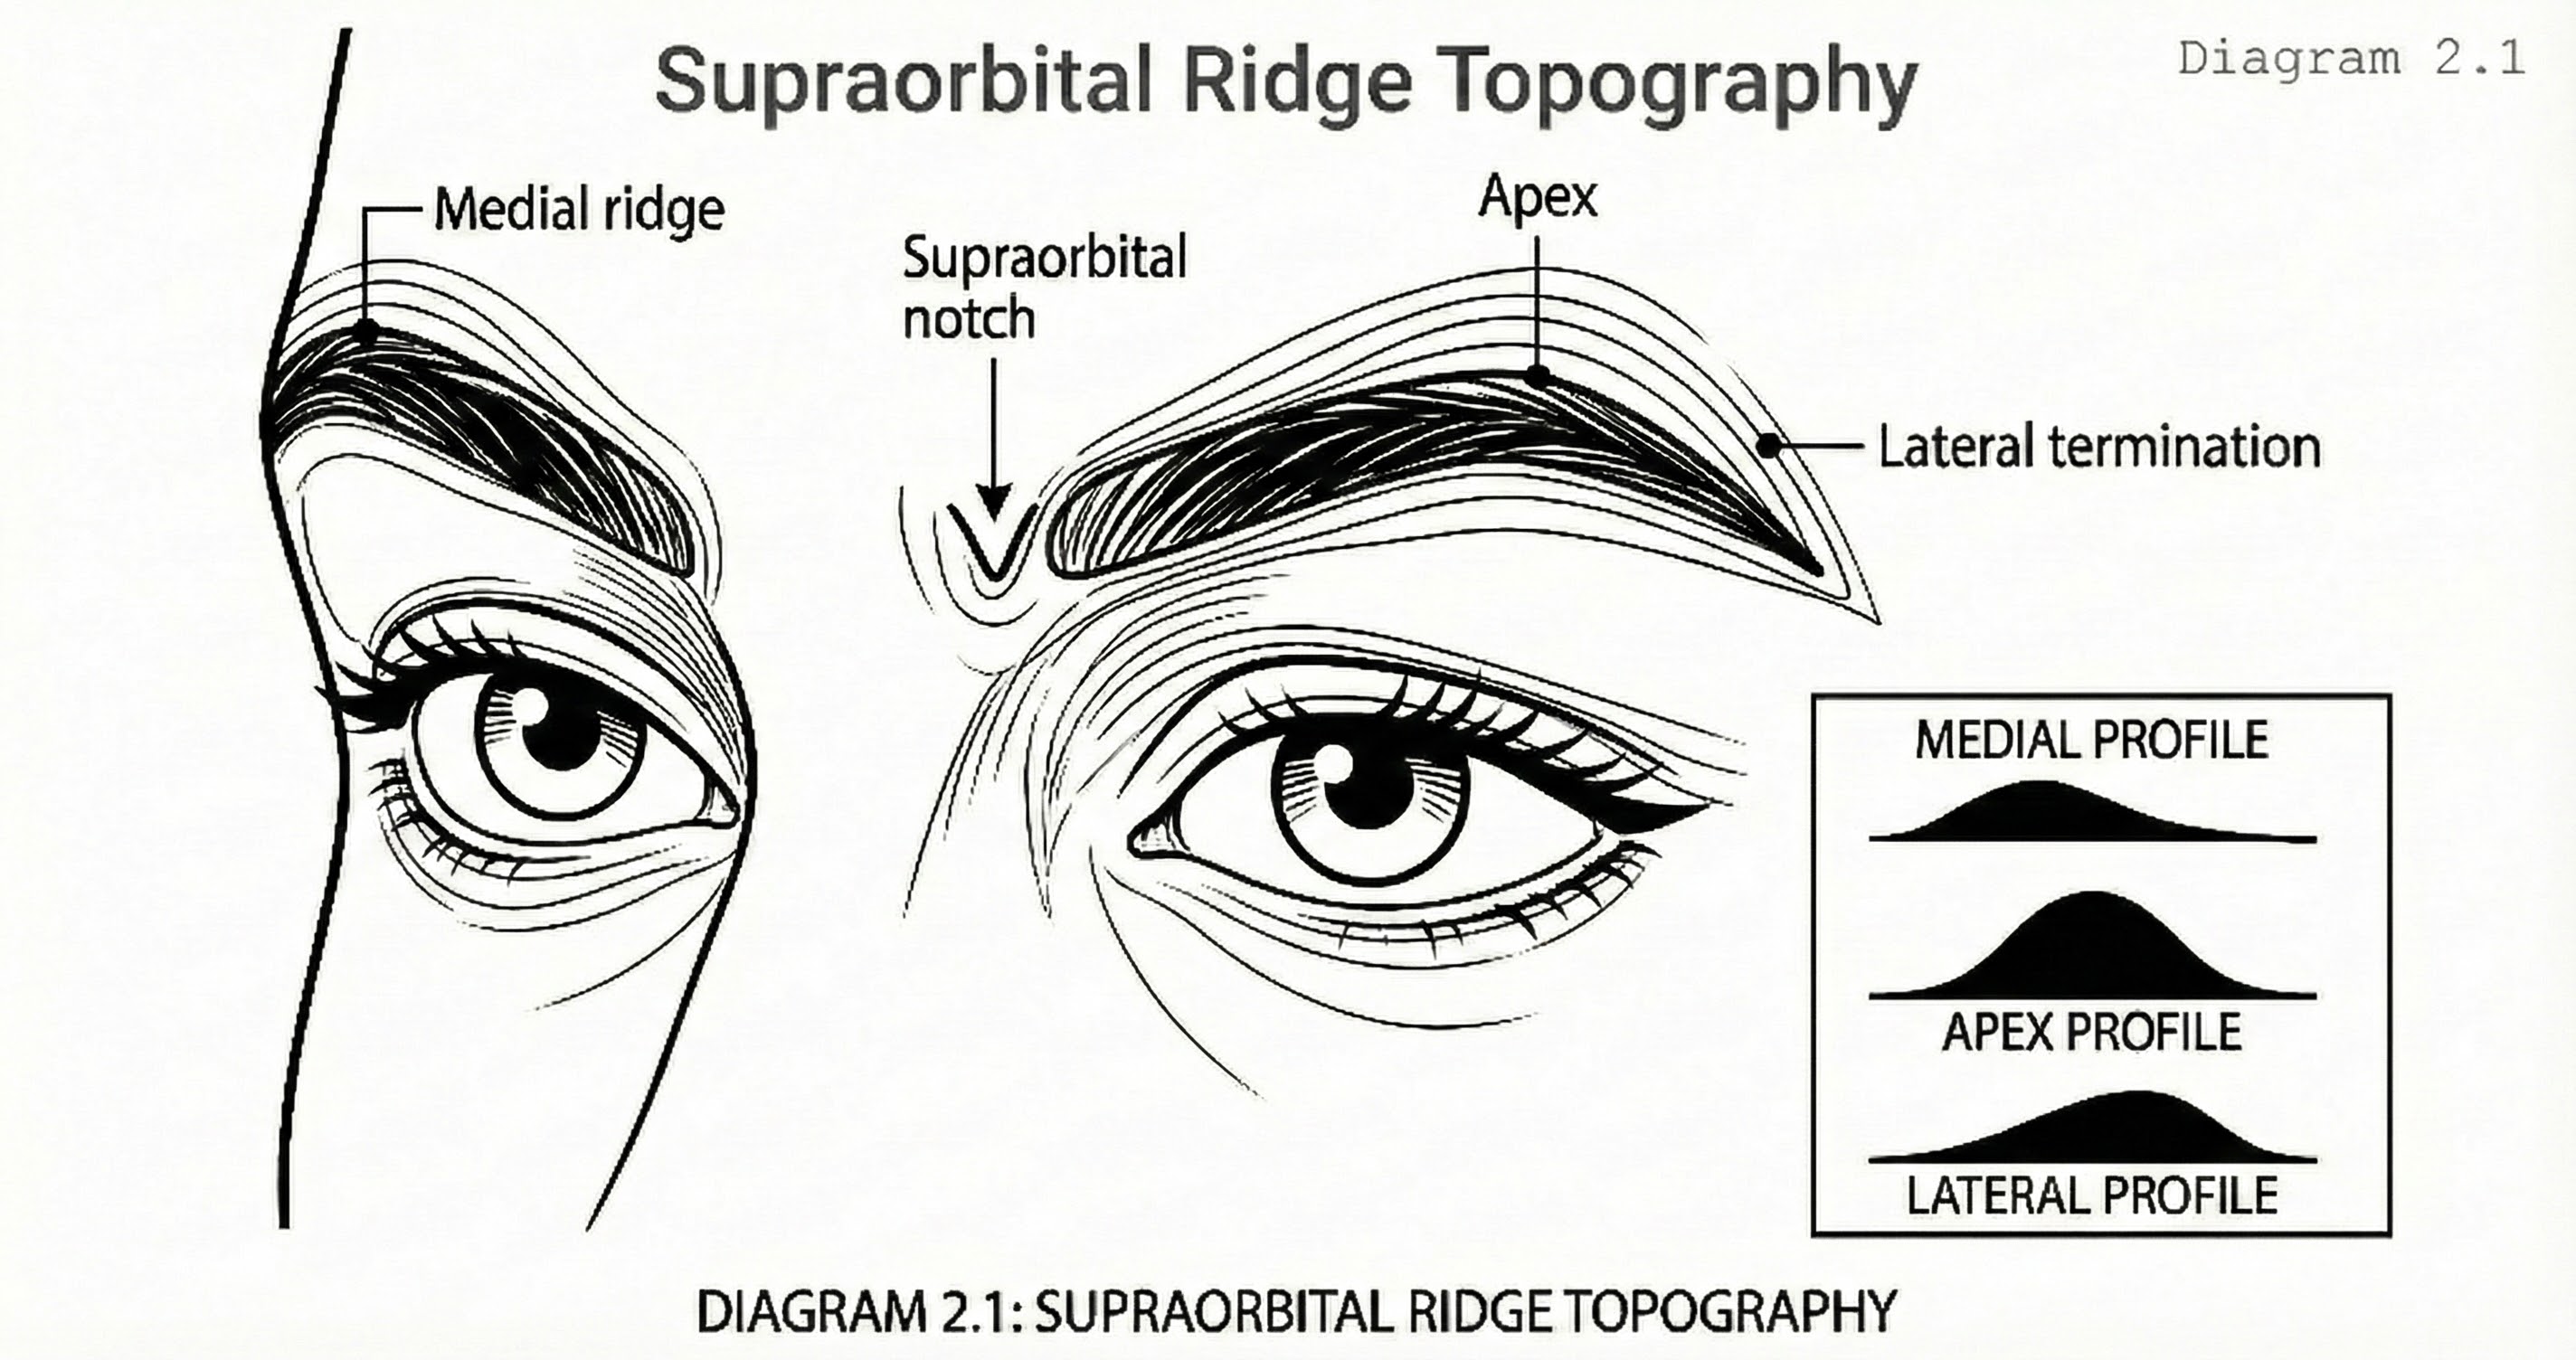
Supraorbital Ridge Topography
Purpose: Show ridge contour variation from superior view
A superior oblique view of the orbital region showing the supraorbital ridge in relief. The ridge is depicted with contour lines indicating prominence variation from medial to lateral. The supraorbital notch is marked with a small V-shaped indentation. Labels identify medial ridge, notch, apex, and lateral termination points.
The Orbital Rim
The orbital rim defines the boundary between the brow region and the eye itself. Rim depth—how far the eye sits within its socket—influences how brows relate visually to eyes.
- Deep-set eyes create shadowed orbital regions where brow tails may appear to recede
- Shallow-set eyes produce prominent orbitals where brows appear more exposed
- Mapping orbital depth informs how brow density, shape, and positioning will read once complete
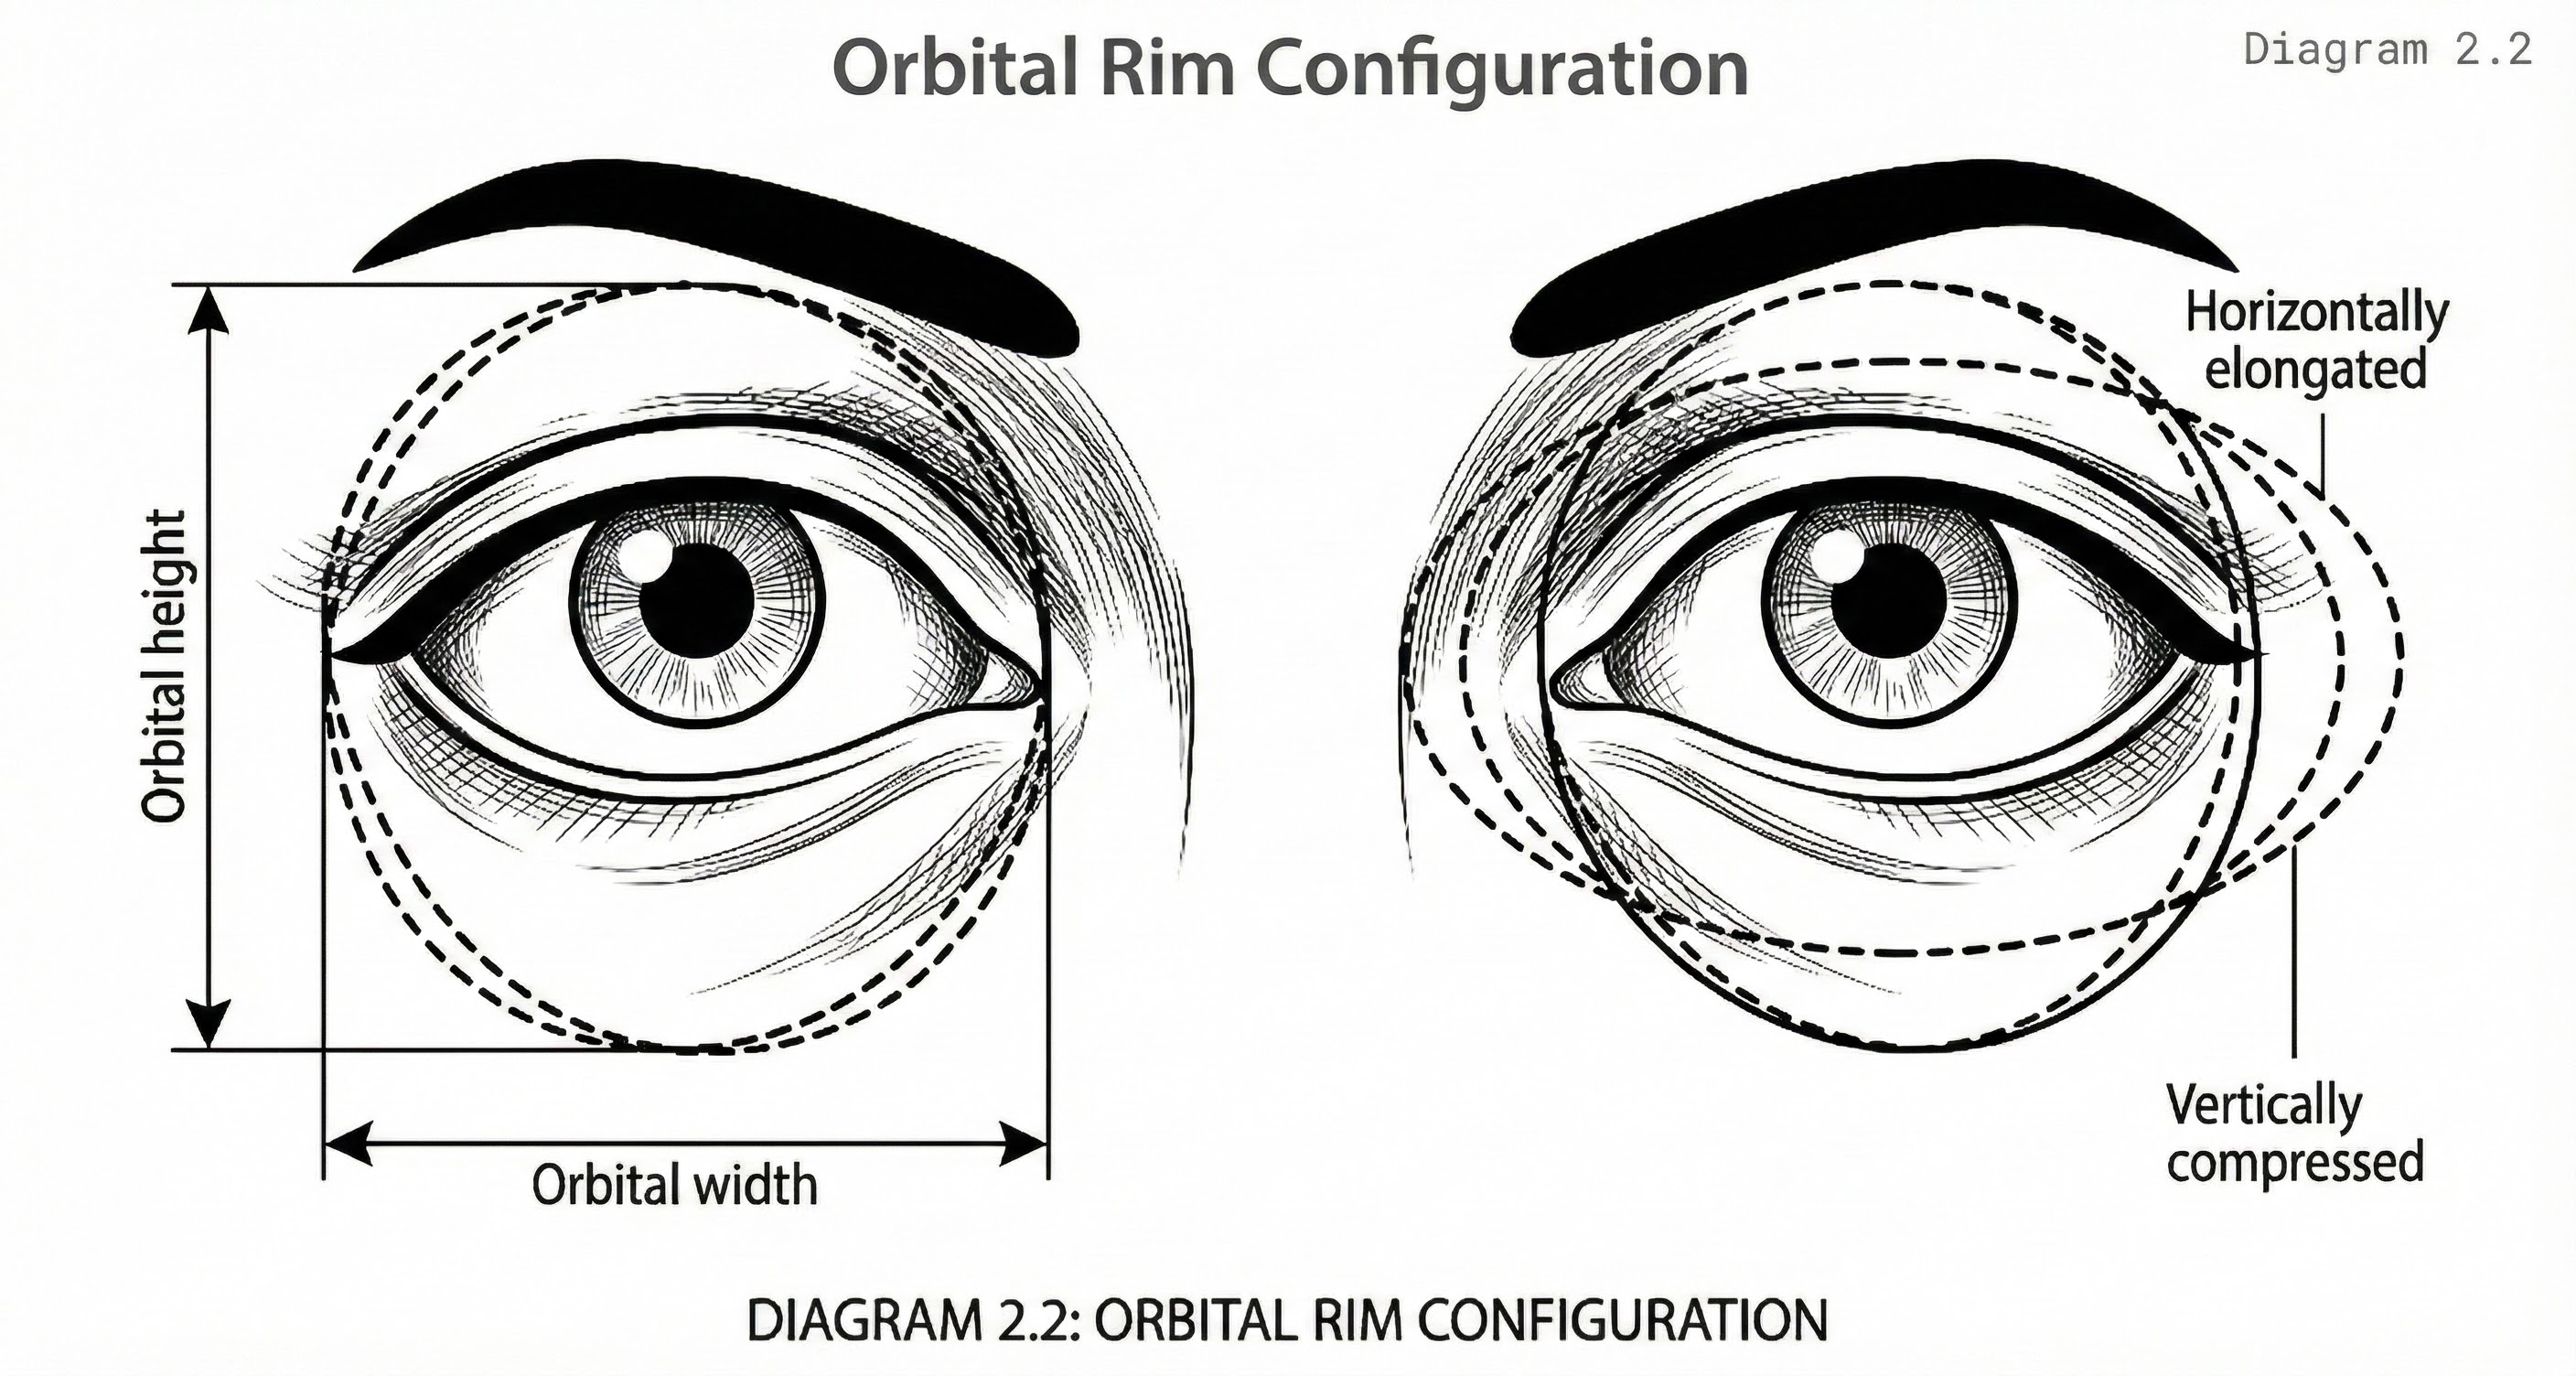
Orbital Rim Configuration
Purpose: Illustrate orbital shape variations
A frontal view of paired orbits with orbital rim contours highlighted. Variations in rim shape are shown in three overlay options: circular, horizontally elongated, and vertically compressed. Measurement lines indicate orbital width and height.
Frontal Bone Slope
The frontal bone slope above the supraorbital ridge influences brow appearance from profile view. A receding forehead places the brow in relative prominence; a vertical or projecting forehead provides backdrop that frames the brow differently. These relationships affect both design choices and client perception of outcomes.
Nasal Bone Configuration
Nasal bone configuration influences medial brow positioning. The relationship between nasal bridge height, nasal root depth, and medial orbital rim contour determines how the head of the brow should be placed. High nasal bridges may support medial brow positions that low bridges would make appear awkward.
Methodology
Bone mapping methodology combines visual assessment, palpation, and systematic documentation. The process follows anatomical logic, proceeding from central to lateral structures and from superior to inferior positions.
Central Structure Mapping
Begins at the glabella—the smooth region between the brows overlying the junction of frontal and nasal bones. Glabellar prominence is assessed through profile observation and palpation. The nasal root is identified below the glabella, where nasal bones meet the frontal bone. The relationship between these structures influences medial brow placement decisions.
Supraorbital Ridge Mapping
Proceeds from medial to lateral. The practitioner palpates the ridge:
- Beginning at its medial extent near the nasal root
- Continuing across the supraorbital notch (a small indentation where nerves and vessels exit the orbit)
- Through the ridge apex (typically above the lateral limbus of the iris)
- Terminating at the lateral orbital rim
Ridge prominence and contour are documented at multiple points along this course.
Orbital Rim Mapping
Traces the complete rim circumference but emphasises the superior and lateral portions most relevant to brow design. Rim depth is assessed by observing eye recession and by palpating the relationship between globe surface and rim edge. Rim shape—whether more circular or horizontally elongated—is documented as it influences apparent eye shape and brow-eye relationship.
Temporal Structure Mapping
Identifies the temporal ridge and temporal fossa. The temporal ridge marks the lateral boundary of the forehead proper and influences lateral brow termination decisions. The temporal fossa—the shallow depression lateral to the forehead—affects how brow tails visually integrate with the lateral face.
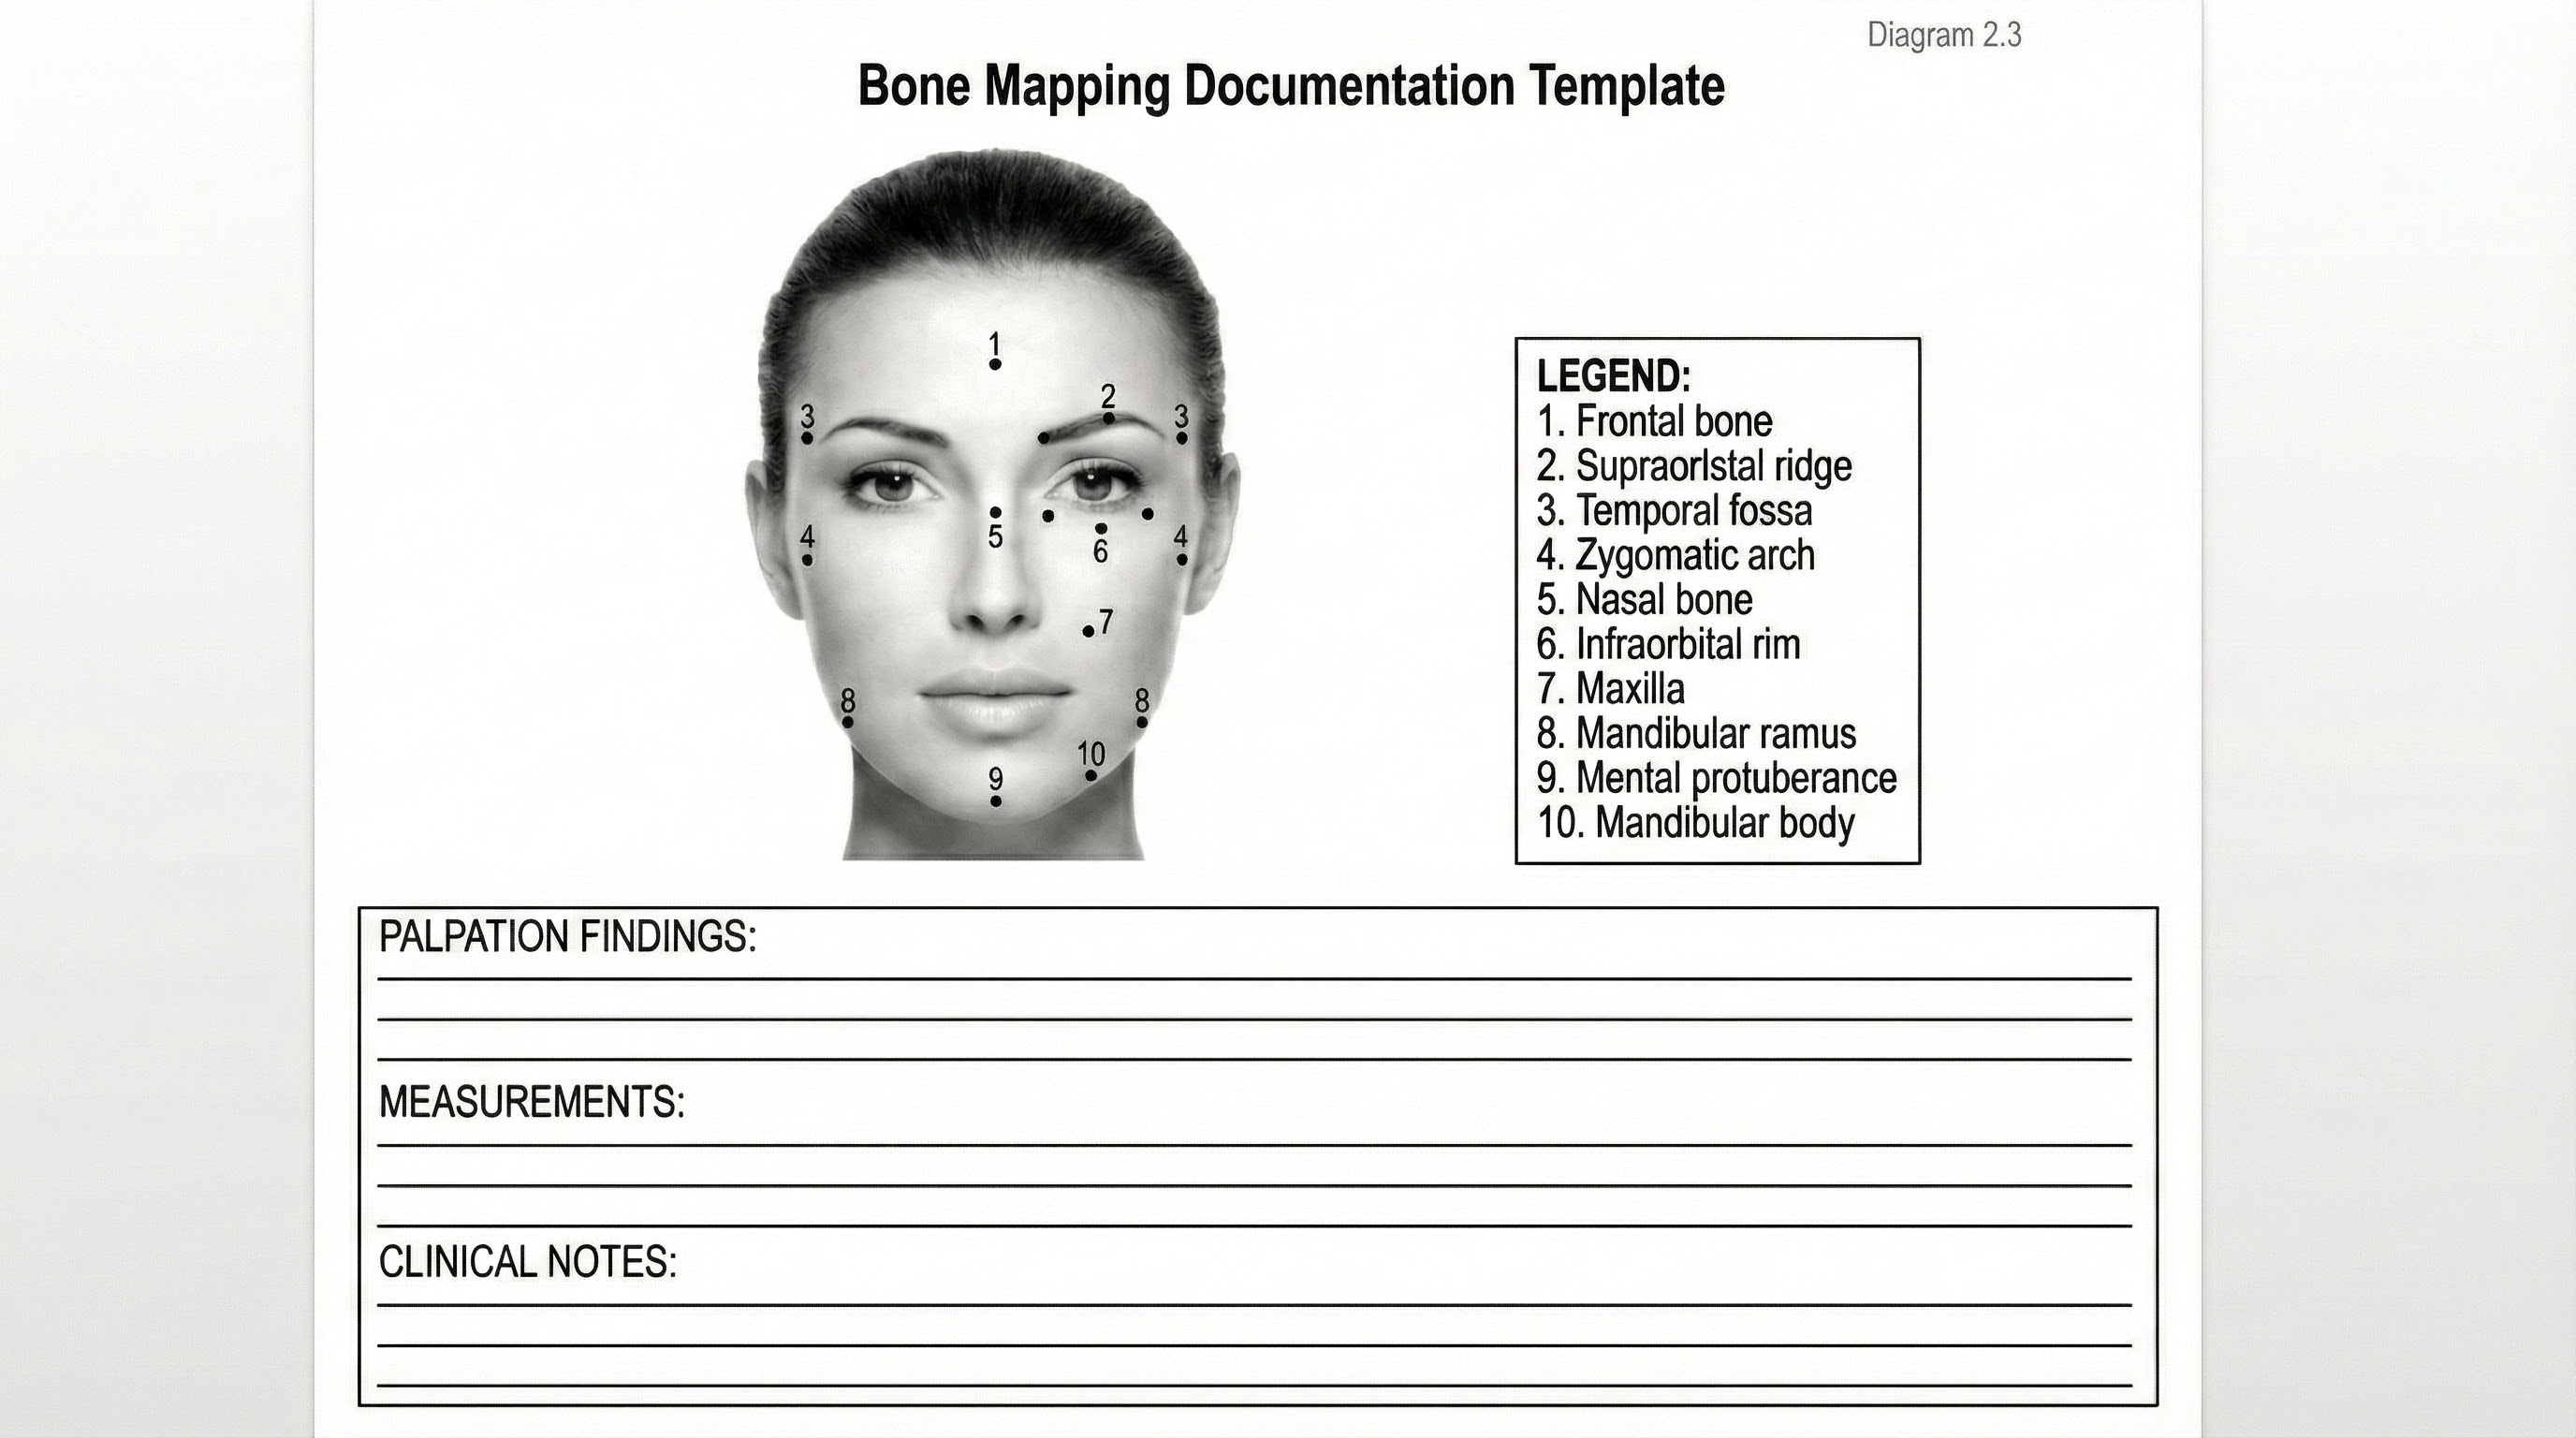
Bone Mapping Documentation Template
Purpose: Provide standardised documentation format
A schematic frontal face outline with bilateral dot markers at standard bone mapping locations. Each dot is numbered and corresponds to a legend listing the anatomical landmark. Space is provided below for recording palpation findings, measurements, and clinical notes.
Techniques
Palpation Mapping Technique
Requires systematic pressure application along skeletal structures. The practitioner uses index and middle fingers together, applying sufficient pressure to feel bone through overlying tissue.
- Starting points and paths are standardised to ensure complete coverage
- Findings are documented in real-time or immediately following palpation
- Tactile memory remains fresh for accurate recording
Marking Technique
Transfers palpated landmarks to the skin surface for visual reference. Using a removable marking medium, the practitioner places dots or short lines at key skeletal landmarks. This creates a visible map that can be photographed, referenced during design, and compared to proposed brow positioning.
Measurement Technique
Quantifies skeletal relationships using calipers or marked flexible rulers:
- Supraorbital ridge length
- Orbital width
- Nasal root to orbital rim distance
- Intercanthal distance
These measurements support proportional analysis and design calculation.
Shadow Mapping Technique
Uses angled lighting to reveal skeletal contour through shadow patterns. A single light source positioned above and to one side of the face creates shadows in concavities and highlights on prominences. Photographing under these conditions documents skeletal topography that may be difficult to capture under standard lighting.
Professional Notes
Bone mapping proficiency requires extensive practice across diverse client presentations. The practitioner develops calibrated tactile sensitivity—the ability to distinguish bone from the muscle, fat, and skin overlying it. This sensitivity cannot be acquired through reading; it requires hands-on experience with varied tissue types and densities.
Documentation systems for bone mapping should be standardised within the practice. Whether using annotated photographs, standardised forms, or digital records, consistent documentation supports comparison across clients and tracking within individual client histories.
Client communication regarding bone mapping requires translation of technical findings into accessible terms. Clients benefit from understanding how their bone structure influences design possibilities, but they do not need anatomical vocabulary. The practitioner develops explanatory frameworks that convey essential information without overwhelming detail.
Common Mistakes
Insufficient Palpation Pressure: A common technical error. Light touch identifies skin surface topography but does not reveal underlying bone. The practitioner must apply enough pressure to feel bone through intervening tissue while remaining comfortable for the client. Calibrating appropriate pressure requires practice and feedback.
Incomplete Mapping Coverage: Leaves structural features unassessed. The practitioner who skips lateral structures, neglects nasal bone assessment, or fails to trace the complete orbital rim operates with incomplete information. Comprehensive mapping requires systematic coverage of all relevant anatomy.
Confusing Bone with Muscle: Creates mapping errors. The corrugator and procerus muscles lie over the medial supraorbital region and can create palpable fullness mistaken for bone. The practitioner learns to distinguish the firm, immobile character of bone from the yielding, potentially contractile character of muscle.
Documentation Omission: Undermines mapping value. The practitioner who maps but fails to document loses information before it can inform design. Real-time documentation during mapping or immediate documentation afterward preserves findings for clinical use.
Expert Insights
Experienced practitioners develop efficient mapping protocols that extract maximum information in minimum time. The efficiency comes not from skipping steps but from integrating steps—palpating while observing, marking while measuring, documenting while assessing. This integration requires extensive practice to achieve.
Unusual skeletal configurations present both challenges and learning opportunities. The client with asymmetric orbital rims, unusually prominent or flat supraorbital ridge, or atypical nasal root depth requires careful mapping that reveals the specific configuration. These cases expand the practitioner's structural vocabulary.
Bone mapping findings sometimes reveal structural factors the client has not recognised. The practitioner may note orbital asymmetry, ridge prominence difference, or other skeletal variations the client has not consciously perceived. Communicating these findings requires sensitivity; they should inform design decisions without creating client distress about previously unnoticed characteristics.
Practical Application
Clinical bone mapping occurs during the initial consultation before any design work begins. The practitioner positions the client appropriately—typically reclined with face accessible—and proceeds through the mapping protocol. Findings are documented in the client record and inform subsequent design discussion.
Design decisions reference bone mapping findings directly. When proposing brow positions, the practitioner explains how proposals relate to skeletal landmarks. When clients request positions that conflict with skeletal architecture, mapping findings support explanation of why alternative positions would be superior.
Follow-up appointments reference original bone mapping documentation. While skeletal structure remains stable, soft tissue changes may alter how structure presents. Comparing current presentation to documented bone map supports assessment of what has changed and what remains constant.